Quantized LSTM
This tutorial describes how to create a quantized ML model with an LSTM layer and run it on an embedded device.
In this tutorial, we investigate the keyword_spotting_numbers model which is based on a custom CNN+LSTM architecture. The model classifies the keywords: “zero” through “nine”. This model has an LSTM layer which analyzes the time-dependencies that are inherent to the input audio samples.
This tutorial focuses on how to create an LSTM model that can be properly quantized and run on an embedded device.
Quick Links
keyword_spotting_numbers - Pre-trained and quantized CNN+LSTM model that classifies the keywords: “zero” through “nine”
Model Quantization Tips - Tutorial providing tips on how to gain better quantization for your model
Understanding LSTM Networks - Overview of how LSTM networks work
Key Takeaways
return_sequences=Truein the tf.keras.layers.LSTM layer configbatch_size=1when quantizing with the TfliteConverterUse the TF-Lite Quantization Debugger to determine which layers are not quantizing well
Normalize the model input data so it is centered around 0.0.
Use the BatchNormalization and LayerNormalization layers to center the activations around 0.0
LayerNormalization at the input and output of the LSTM layer is critical to ensure accurate quantization
About LSTMs
An LSTM (Long Short-Term Memory) layer is a recurrent neural network (RNN) layer that learns long-term dependencies between time steps in time series and sequence data. The layer performs additive interactions, which can help improve gradient flow over long sequences during training.
LSTMs are predominantly used to learn, process, and classify sequential data. Common LSTM applications include sentiment analysis, language modeling, speech recognition, and video analysis.
An LSTM unit consists of a cell, an input gate, an output gate, and a forget gate. An LSTM unit can be considered as a layer of neurons in a traditional feedforward neural network, with each neuron having a hidden layer and a current state.
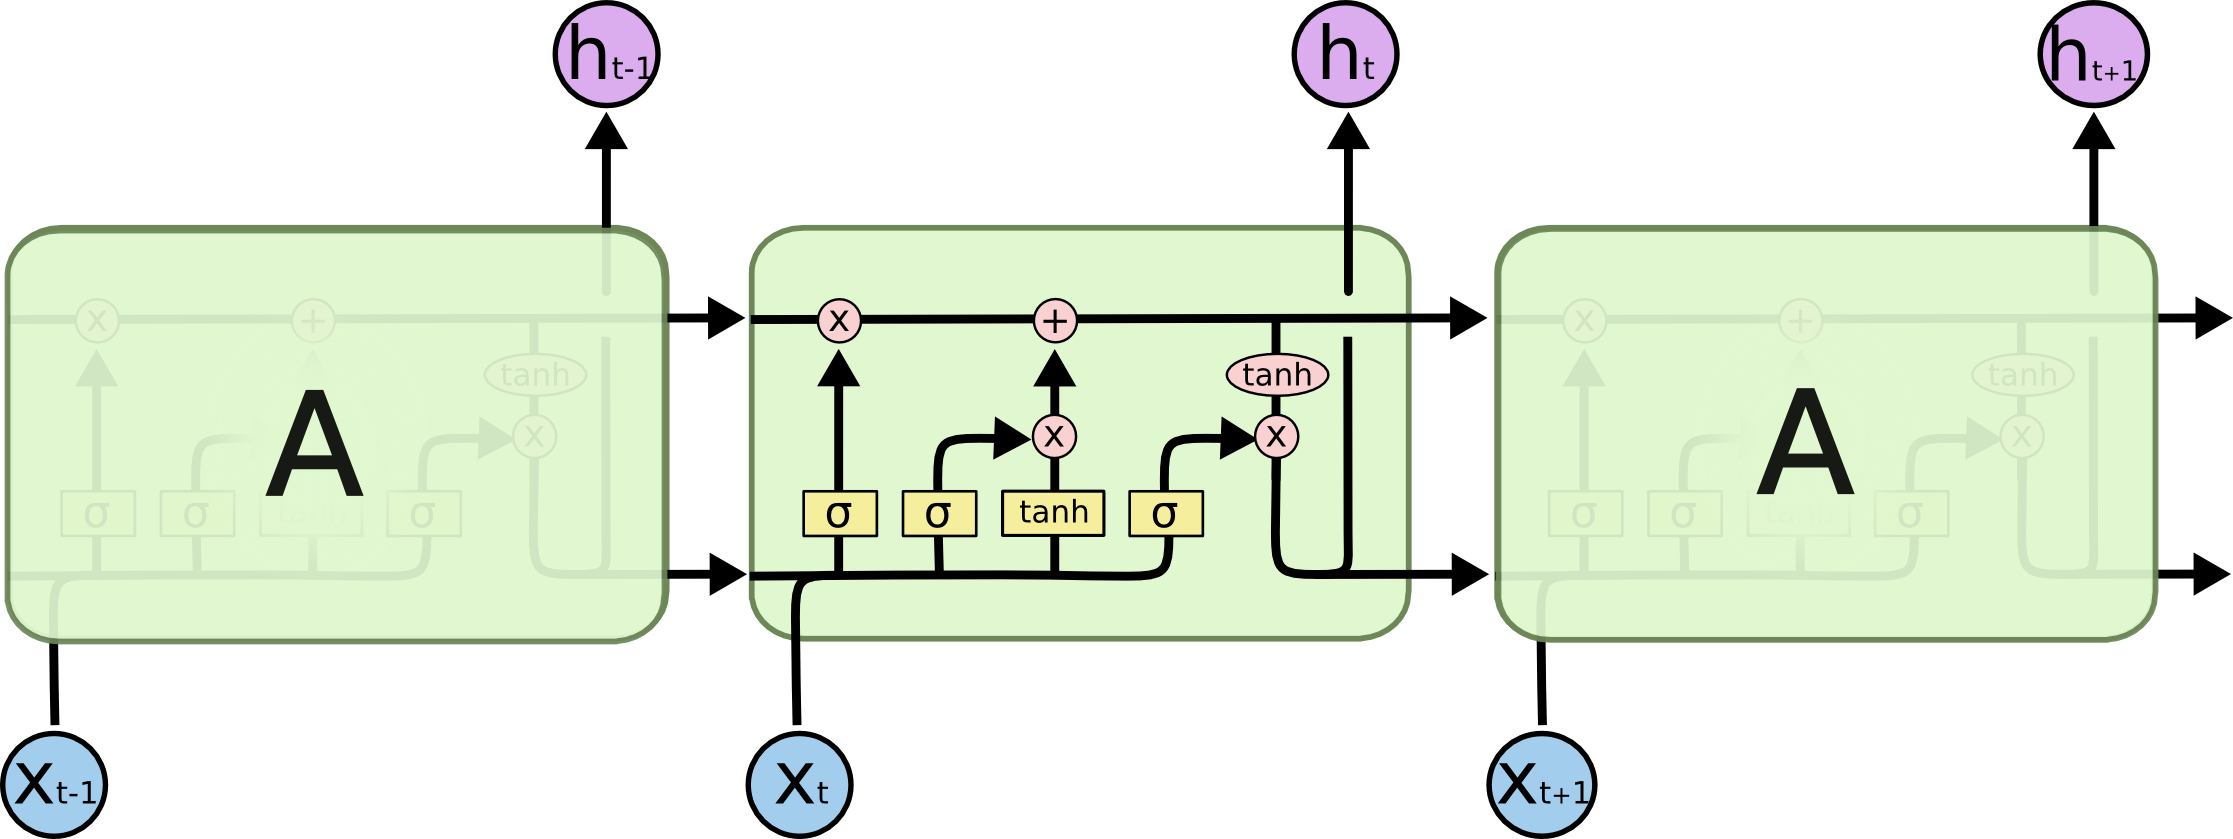
For more details, refer to the following document: Understanding LSTM Networks.
Quantizing an LSTM Model
There are many examples that demonstrate how to generate a .tflite from an LSTM model, e.g.:
While these models have high accuracy with float32 weights, many times their accuracies are severely reduced when quantized with int8 weights.
The following sections show how the keyword_spotting_numbers, a CNN+LSTM model, was developed to obtain good int8 quantization accuracy.
NOTE: Also refer to the Model Quantization Tips tutorial for more details on how to create a model that quantizes well.
Model Settings
The following settings were used in the keyword_spotting_numbers to allow for generating a quantized .tflite with an int8 LSTM layer:
LSTM Layer Config
Tensorflow-Lite Micro supports an int8 LSTM kernel. To use this kernel, your model must define the following LSTM layer config:
x = tf.keras.layers.LSTM(
    n_cell,               # The number of LSTM cells to use
    activation='tanh',    # TFLM only supports the tanh activation
    return_sequences=True # This is required so that the LSTM layer is properly generated in the .tflite
)(x)
return_sequences=True is required to properly generate the .tflite.
This will return an output tensor with the shape: <batch> x <time steps> x <features>.
If you only want to use the last time step, add the following after the LSTM layer:
# Obtain the last time step, new output shape is: <batch> x <features>
x = tf.keras.layers.Lambda(lambda x: x[:, -1, :])(x)
Tensorflow-Lite Converter Settings
The following TfliteConverter settings were used to quantize the model:
# These are the settings used to quantize the model.
# We want all the internal ops to use int8
# while the model input/output is float32.
# (the TfliteConverter will automatically add the quantize/dequantize layers)
my_model.tflite_converter['optimizations'] = [tf.lite.Optimize.DEFAULT]
my_model.tflite_converter['supported_ops'] = [tf.lite.OpsSet.TFLITE_BUILTINS_INT8]
# We are normalizing the input samples, so the input/output must be float32
my_model.tflite_converter['inference_input_type'] = np.float32
my_model.tflite_converter['inference_output_type'] = np.float32
# Automatically generate a representative dataset from the validation data
my_model.tflite_converter['representative_dataset'] = 'generate'
# Use 1000 samples from each class to determine the quantization ranges
my_model.tflite_converter['representative_dataset_max_samples'] = 10*1000
# Generate a quantization report to help with debugging quantization errors
my_model.tflite_converter['generate_quantization_report'] = True
NOTE: While the model internally uses int8 tensors, the input/output layers are float32. This is because we “normalize” the input data (more details in the following sections).
Force the batch size=1 during quantization
During training, we want the batch size to be larger than 1 (e.g. 32) as this helps to improve the training time. However, during quantization the batch size must be 1 as the TfliteConverter seems to hang if the batch size is not set.
To account for this, we add the following to our model script:
def my_model_builder(model: MyModel, batch_size:int=None) -> tf.keras.Model:
    # If specified, force the model input's batch_size to the given value
    input_layer = tf.keras.layers.Input(shape=input_shape, batch_size=batch_size)
Additionally, we add the following event handlers. These are called just before quantization and evaluation so that the batch size can be forced to 1.
def _before_save_train_model(
        mltk_model:mltk_core.MltkModel,
        keras_model:mltk_core.KerasModel,
        keras_model_dict:dict,
        **kwargs
    ):
    """This is called just before the trained moved is saved to a .h5
    This forces the batch_size=1 which is necessary when quantizing the model into a .tflite.
    """
    old_weights = keras_model.get_weights()
    new_keras_model = my_model_builder(mltk_model, batch_size=1)
    new_keras_model.set_weights(old_weights)
    keras_model_dict['value'] = new_keras_model

my_model.add_event_handler(mltk_core.MltkModelEvent.BEFORE_SAVE_TRAIN_MODEL, _before_save_train_model)


def _evaluate_startup(mltk_model:mltk_core.MltkModel, **kwargs):
    """This is called at the beginning of the model evaluation API.
    This forces the batch_size=1 which is necessary as that is how the .h5 and .tflite model files were saved.
    """
    mltk_model.batch_size = 1

my_model.add_event_handler(mltk_core.MltkModelEvent.EVALUATE_STARTUP, _evaluate_startup)
Debugging Quantization Errors
Tensorflow-Lite comes with an experimental Quantization Debugger:
Quantization debugger makes it possible to do quantization quality metric analysis in the existing model. Quantization debugger can automate processes for running model with a debug dataset, and collecting quantization quality metrics for each tensors.
While the Quantization Debugger may be invoked manually, the MLTK will also automatically invoke it by adding the following to your model script:
my_model.tflite_converter['generate_quantization_report'] = True
During model quantization, a ~/.mtlk/models/<model name>/quantization_report.csv report file will be generated.
Refer to the Model Quantization tutorial for more details.
Analyzing the report
For each row in the report, the op name and index comes first, followed by quantization parameters and error metrics. The last column of the report contains:
rmse/scale -
sqrt(mean_squared_error) / scale. This value is close to1 / sqrt(12)(~ 0.289) when quantized distribution is similar to the original float distribution, indicating a good quantized model. The larger the value is, the more likely the layer is not being quantized well.
Layers with a large rmse/scale will likely contribute to poor performance of the model at runtime on the embedded device.
Refer to the Data Normalization section for ways to help reduce the rmse/scale.
Data Normalization
Model quantization is the process of converting the model weights/filters/activations from float32 (32-bits) to int8 (8-bits). This tends to work best if the original float32 data is distributed around 0.0 (e.g. -1.0 to 1.0).
To help achieve this, data normalization is used. Data normalization involves scaling the data so that it fits within the desired range. The following data normalization techniques were used in the keyword_spotting_numbers model:
Normalize the input data
The output of the AudioFeatureGenerator is a uint16 spectrogram. We use sample-wise normalization to center each uint16 value about 0.0 using:
spectrogram_float32 = spectrogram_uint16.astype(float32)
normalized_spectrogram_float32 = (spectrogram_float32 - mean(spectrogram_float32)) / std(spectrogram_float32)
To do this, we add the following to our model script:
Return uint16 from the audio frontend
The output data type of the audio frontend is uint16:
spectrogram = audio_utils.apply_frontend(
    sample=augmented_sample,
    settings=padded_frontend_settings,
    dtype=np.uint16 # We just want the raw, uint16 output of the generated spectrogram
)
Use NumPy to normalize the spectrogram
The following NumPy code is used to normalize the uint16 spectrogram:
# Normalize the spectrogram input about 0
# spectrogram = (spectrogram - mean(spectrogram)) / std(spectrogram)
# This is necessary to ensure the model is properly quantized
# NOTE: The quantized .tflite will internally converted the float32 input to int8
spectrogram = spectrogram.astype(np.float32)
spectrogram -= np.mean(spectrogram, dtype=np.float32, keepdims=True)
spectrogram /= (np.std(spectrogram, dtype=np.float32, keepdims=True) + 1e-6)
Use float32 for the quantized model input
The following TfliteConverter settings are used to ensure the input to the quantized model is float32:
my_model.tflite_converter['inference_input_type'] = np.float32
my_model.tflite_converter['inference_output_type'] = np.float32
NOTE: Internally, the float32 input is automatically converted int8.
Normalize the spectrogram at runtime on the embedded device
Whatever preprocessing we apply to the data during model training also needs to be done at runtime on the embedded device. We use the following model parameter which tells the AudioFeatureGenerator on the embedded device to normalize the data:
# Set the sample-wise normalization setting.
# This tells the embedded audio frontend to do:
# spectrogram = (spectrogram - mean(spectrogram)) / std(spectrogram)
my_model.model_parameters['samplewise_norm.mean_and_std'] = True
Use BatchNormalization when possible
While input data normalization can help reduce the rmse/scale of the model input layer, we also need to normalize the inputs of the intermediate layers of the model. For this, we use:
Batch Normalization is preferred as it can be fused with other layers which reduces the computational overhead of the model.
The TENet model architecture uses Batch Normalization internally.
Use LayerNormalization
Due to the inherent time dependencies of the LSTM layer, Batch Normalization cannot be directly used as it maintains metrics across multiple batch samples. As such, we must use Layer Normalization as this normalizes each sample independently.
To ensure the data is evenly distributed around 0.0 (and thus allow it to better quantize from float32 to int8), we use Layer Normalization at the input and output of the LSTM layer:
# It is critical that we normalize the LSTM input, i.e.
# lstm_input = (cnn_features - mean(cnn_features)) / std(cnn_features)
# This helps to ensure that the LSTM layer is properly quantized.
x = tf.keras.layers.LayerNormalization()(x)

# We use an LSTM layer to generate features based on the recurrent nature of the spectrogram.
# This analyzes the patterns of the <n_frequency_bins> frequency bins along the time axis.
x = tf.keras.layers.LSTM(
    n_frequency_bins,      # We want 1 LSTM cell for each spectrogram frequency bin
    activation='tanh',    # Embedded only supports the tanh activation
    return_sequences=True # This is required so that the LSTM layer is properly generated in the .tflite
                            # If this is false, the a WHILE layer is used which is not optimal for embedded
)(x)

# It is critical that we normalize the LSTM output, i.e.
# lstm_features = (lstm_features - mean(lstm_features)) / std(lstm_features)
# This helps to ensure that the LSTM layer is properly quantized.
x = tf.keras.layers.LayerNormalization()(x)

# The output of the LSTM is:
# <batch_size, cnn_time_steps, n_frequency_bins>
# However, only the last row of the LSTM is meaningful,
# so we drop the rest of the rows:
# <batch_size, last_row_lstm_features>
x = tf.keras.layers.Lambda(lambda x: x[:, -1, :])(x)
Evaluation Results
Float32 weights/activations
The keyword_spotting_numbers float32 weights/activations evaluation results are as follows:
mltk evaluate keyword_spotting_numbers

Name: keyword_spotting_numbers
Model Type: classification
Overall accuracy: 93.840%
Class accuracies:
- seven = 96.723%
- eight = 96.404%
- nine = 94.746%
- six = 94.701%
- zero = 94.508%
- three = 94.198%
- two = 93.915%
- one = 93.873%
- four = 93.249%
- five = 90.882%
- _unknown_ = 89.846%
Average ROC AUC: 99.241%
Class ROC AUC:
- seven = 99.723%
- eight = 99.715%
- four = 99.342%
- one = 99.329%
- zero = 99.294%
- nine = 99.289%
- three = 99.260%
- six = 99.227%
- two = 99.080%
- _unknown_ = 98.756%
- five = 98.636%
int8 weights/activations
The keyword_spotting_numbers int8 weights/activations evaluation results are as follows:
mltk evaluate keyword_spotting_numbers --tflite

Name: keyword_spotting_numbers
Model Type: classification
Overall accuracy: 90.116%
Class accuracies:
- seven = 94.478%
- six = 94.023%
- three = 92.764%
- zero = 92.215%
- eight = 91.135%
- nine = 90.165%
- two = 90.043%
- one = 88.848%
- four = 88.265%
- five = 86.836%
- _unknown_ = 83.744%
Average ROC AUC: 98.535%
Class ROC AUC:
- seven = 99.258%
- three = 98.892%
- six = 98.784%
- two = 98.709%
- zero = 98.701%
- nine = 98.615%
- eight = 98.611%
- four = 98.457%
- one = 98.379%
- five = 97.937%
- _unknown_ = 97.545%
Remarks
So converting this CNN+LSTM model from float32 to int8 lost about 3% of model accuracy which is good, not great (typically, quantizing CNN-only models looses 1-2% of accuracy).
The key for allowing the quantization of the LSTM layer is to surround it with the Layer Normalization layer.
Ideally, we would use the LayerNormLSTMCell which applies additional normalization to the LSTM’s internal tensors, however, this layer is not currently supported by Tensorflow-Lite Micro.
Quantization Report
The generated quantization_report.csv is in the keyword_spotting_numbers.mltk.zip model archive.
A snippet of the report is as follows:
op_name |
num_elements |
stddev |
mean_error |
max_abs_error |
mean_squared_error |
scale |
zero_point |
range |
rmse/scale |
|---|---|---|---|---|---|---|---|---|---|
CONV_2D |
3920.0 |
0.062017273 |
-0.00017696062 |
0.23714127 |
0.0038493355 |
0.18038306 |
3 |
45.997680300000006 |
0.3439514403696602 |
CONV_2D |
11760.0 |
0.03295127 |
-0.0004035881 |
0.12613823 |
0.0010864673 |
0.1565376 |
-128 |
39.917088 |
0.21056668442429635 |
DEPTHWISE_CONV_2D |
5880.0 |
0.035719264 |
0.0008537201 |
0.2155346 |
0.001277669 |
0.16985875 |
-128 |
43.31398125 |
0.2104365896947685 |
CONV_2D |
1960.0 |
0.07850939 |
-0.00044384212 |
0.18113996 |
0.0061679697 |
0.26804927 |
-4 |
68.35256385 |
0.2929924888823545 |
CONV_2D |
1960.0 |
0.028141052 |
4.167329e-05 |
0.09747819 |
0.00079393975 |
0.123283505 |
-128 |
31.437293775 |
0.2285539861207166 |
UNIDIRECTIONAL_SEQUENCE_LSTM |
280.0 |
0.061724134 |
0.01658498 |
0.44125158 |
0.0051669613 |
0.007843136 |
-1 |
1.9999996800000002 |
9.164902700610854 |
FULLY_CONNECTED |
11.0 |
0.38768843 |
0.002292617 |
0.72559375 |
0.16979334 |
1.2712529 |
18 |
324.1694895 |
0.3241368214696956 |
SOFTMAX |
11.0 |
0.0008727249 |
-0.00027066743 |
0.0026643767 |
9.2000795e-07 |
0.00390625 |
-128 |
0.99609375 |
0.24554763491265805 |
As we can see, the UNIDIRECTIONAL_SEQUENCE_LSTM layer has a rmse/scale of 9.16 (ideally this should be closer to 0.289). This is likely contributing to the quantized model’s reduced accuracy. Note that without the Layer Normalization around the LSTM the accuracy gets substantially worse.
Next Steps
The pre-trained model used by this tutorial is available at keyword_spotting_numbers.mltk.zip.
You can test this model on a BRD2601 development board by running the command:
mltk classify_audio keyword_spotting_numbers --accelerator mvp --device --verbose