Image Classifier
This application allows for classifying images retrieved from an ArduCAM camera. The results of the image classification are printed to the serial terminal.
Optionally, images from the camera can be dumped to the local PC via mltk classify_image command.
NOTE: This application only supports running on supported embedded targets (Windows/Linux is not supported).
Quick Links
GitHub Source - View this example’s source code on Github
Hardware Setup - View the required hardware setup for this example
Online documentation - View this example’s online documentation
Image Classification Tutorial - View this example’s associated tutorial
Arducam Camera Module - View the camera module’s product page
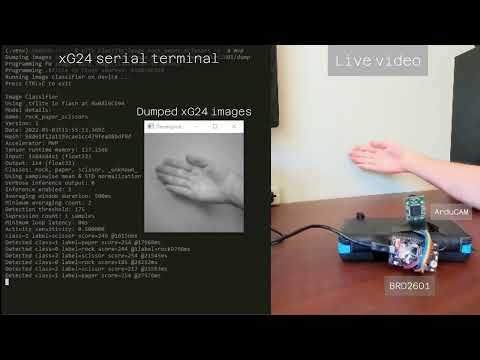
Video
A demo video of this application may be found here:
Behavior
The application executes the following loop:
Read image from ArduCAM camera
Optionally “normalize” the based on the parameters embedded in the classification
.tflitemodel file (see the “Model Input Normalization” section below)Give normalized image Tensorflow-Lite Micro Interpreter
Process interpreter results with optional averaging and thresholding. If a classification result has a high enough probability then it is considered “detected” In this case, print the detection result to the serial console and turn the green LED on.
If the probability is lower than the detection threshold, then turn the red LED on which indicates that there is activity but no detection.
NOTE: Class labels that start with an underscore (e.g. _unknown_) are ignored from detection.
Classification Model
This application expects an “image classification” model.
Model Input
The model input should have the shape: <image height> x <image width> x <image channels>
where <image channels> should be either one (i.e. 8-bit grayscale) or three (i.e. 8-bit RGB).
The datatype should be either int8 or float32.
Model Input Normalization
The application also supports “normalizing” the input.
If the samplewise_norm.rescale model parameter
is given, then each element in the image is multiplied by this scaling factor, i.e.:
model_input_tensor = img * samplewise_norm.rescale
If the samplewise_norm.mean_and_std model parameter
is given, then each element in the image is centered about its mean and scaled by its standard deviation, i.e.:
model_input_tensor = (img - mean(img)) / std(img)
In both these cases, the model input data type must be float32.
If the model input data type is int8, then the image data type is automatically converted to from uint8 to int8, i.e.:
model_input_tensor = (int8)(img - 128)
If the model input data type is float32 and no normalization is done, then the image data type is automatically converted to from uint8 to float32, i.e.:
model_input_tensor = (float)img
Model Output
The model output should have the shape 1 x <number of classes>
where <number of classes> should be the number of classes that the model is able to detect.
The datatype should be either int8 or float32
NOTE: TFLM expects the model input and output to have the same data type.
Updating the model
The application will run any quantized image classification .tflite model file.
A default model comes with the application, however, this model may be updated
using several different methods:
via Simplicity Studio
To replace the default model, rename the your .tflite file to
1_<your model named>.tflite and copy it into the config/tflite folder of Simplicity Studio
project. (Simplicity Studio sorts the models alphabetically in ascending order, adding 1_
forces the model to come first). After a new .tflite file is added to the
project Simplicity Studio will automatically use the
flatbuffer converter tool
to convert a .tflite file into a c file which is added to the project.
Refer to the online documentation for more details.
via classify_image Command
Alternatively, using the mltk classify_image <model path> --app none
command program the .tflite model to the end of the device’s flash.
On startup, the application will detect the new model and use that instead
of the model built into the firmware.
NOTE: The --app none option tells the command to not update the image_classifier application and only program the model file.
via CMake
The model can also be updated when building this application from Visual Studio Code or the CMake Command Line.
To update the model, create/modify the file: <mltk repo root>/user_options.cmake
and add:
mltk_set(IMAGE_CLASSIFIER_MODEL <model name or path>)
where <model name or path> is the file path to your model’s .tflite
or the MLTK model name.
With this variable set, when the image_classifier application is built the specified model will be built into the application.
via update_params command
When building for an embedded target, this application supports overriding the default model built into the application.
When the application starts, it checks the end of flash memory for a .tflite model file. If found, the model
at the end of flash is used instead of the default model.
To write the model to flash, use the command:
mltk update_params <model name> --device
Refer to the command’s help for more details:
mltk update_params --help
Hardware Setup
To run this application, an ArduCAM module is required. This camera must be connected to the SPI and I2C peripheral of the embedded target.
The following default pin mappings are used by:
BRD2601
| ArduCAM Pin | Board Expansion Header Pin |
|---|---|
| GND | 1 |
| VCC | 18 |
| CS | 10 |
| MOSI | 4 |
| MISO | 6 |
| SCK | 8 |
| SDA | 16 |
| SCL | 15 |
Build, Run, Debug
See the online documentation for how to build and run this application:
Simplicity Studio
If using Simplicity Studio select the MLTK - Image Classifier Project.
Visual Studio Code
If using Visual Studio Code select the mltk_image_classifier CMake target.
Command-line
If using the Command Line select the mltk_image_classifier CMake target.
Dumping images to PC
This application works with the MLTK command:
mltk classify_image --help
Using this command, you can dump images to the local PC.
For example:
mltk classify_image rock_paper_scissors --dump-images --dump-threshold 0.1
which will display the images from the camera and also save sufficiently different images as a .jpg file.
Build Settings
When building this application using Visual Studio Code or the Command Line several options may be configured to control how the app is built.
To specify the settings, create/modify the file:
<mltk repo root>/user_options.cmake
The following settings are supported:
IMAGE_CLASSIFIER_MODEL
Optionally, configure the .tflite model to profile:
# Specify the path to the .tflite model file to use
# by the mltk_image_classifier application
mltk_set(IMAGE_CLASSIFIER_MODEL ~/my_models/my_model.tflite)
HINT:
You can also specify the path to the .mltk.zip model archive or just specify the MLTK model name, e.g.:
# Specify the path to the model archive
mltk_set(IMAGE_CLASSIFIER_MODEL ~/my_models/my_model.mltk.zip)

# Specify the MLTK model name
# NOTE: The model specification must be on the model search path, see:
#       https://siliconlabs.github.io/mltk/docs/guides/model_search_path.html
mltk_set(IMAGE_CLASSIFIER_MODEL rock_paper_scissors)
TFLITE_MICRO_ACCELERATOR
Optionally, configure the target hardware accelerator:
# Use the Gecko SDK MVP TFLM kernels
mltk_set(TFLITE_MICRO_ACCELERATOR mvp)