Unify Developer Guide
This is a guide for developers who wish to get started on adding or modifying the Unify SDK source code.
Other Guides related to development are
Directory Structure and File Naming Conventions
Rules
All filenames must be lower case except the following:
CMakeLists.txt
Dockerfile
Makefile
Jenkinsfile
Files provided by external libraries
Use _ for spaces in file/folder names
Structure of Components (Best Practice)
This is a best practice for component folder structure. Note that exceptions exist for this, such as Contiki and libs2.
.
|-- unify_my_sample_component/
|   |-- platform/           // Platform specific
|   |   `-- posix/          // Posix specific
|   |-- include/            // Public interface of components
|   |-- resource/           // Various resources, e.g. xml files for code generation etc.
|   |-- src/                // Source code and private header files
|   |-- test/               // Unittest for component
|   |-- tools/              // Tools e.g. for building, python scripts etc.
|   `-- CMakeLists.txt      // CMakeLists.txt for the component
Library names and folders of Unify components are required to be prefixed with unify_, i.e. “unify_my_sample_component”.
Structure
.
|-- applications/               // Unify application specific code goes here
|   |-- examples/                    // Unify Examples
|   |   |-- applications/
|   |       |--emulated_end_device/         // Emulated End Device(EED)
|   |-- gms/                    // GMS application code
|   |-- upvl/                   // UPVL application code
|   `-- ...
|-- cmake/                      // Cmake toolchains, modules and includes
|   |-- include/
|   |   `--                     // Various CMake includes e.g. compiler_options.cmake, doxygen.cmake, ...
|   |-- modules/                // CMake modules
|   |-- armhf_debian.cmake      // Toolchain files goes here in the format `<arch>(_<dist>).cmake`
|   |-- arm64_debian.cmake      // Toolchain file for AARCH64/arm64
|-- components/                 // Shared components (components shared between Unify applications)
|   |-- uic_config/             // config component
|   |   |-- platform/
|   |   |   |-- posix/          // Posix platform specific must be in platform/posix folder for all components (except external components, where this is handled differently)
|   |   |-- include/            // non platform specific public interfaces goes here
|   |   |-- src/                // non platform specific source code and private interfaces goes here
|   |   |-- test/               // Unittests for the component goes in here
|   |   `-- CMakeLists.txt
|   |-- uic_log/                // Logging framework
|   |-- uic_mqtt/               // MQTT client library
|   |-- ...
|   `-- CMakeLists.txt
|-- dist/                       // Files for the "target" platform goes here e.g. init scripts, config files, etc.
|   `-- CMakeLists.txt
|-- doc/                        // Documentation written in markdown format
|   `-- readme_developer.md     // This document
|-- docker/Dockerfile           // Dockerfile for compiling and cross-compiling ZPC
|-- CMakeLists.txt              // Root CMakeLists.txt
`-- Jenkinsfile                 // Jenkinsfile for CI on Jenkins
Clang-Format (autoformat code)
Clang-format is a tool that can format code according to coding style configuration.
The .clang-format file in this repository depends on clang-format 10.
Install on Mac
brew install llvm
ln -s "$(brew --prefix llvm)/bin/clang-format" "/usr/local/bin/clang-format"
Install on Ubuntu
wget -O - https://apt.llvm.org/llvm-snapshot.gpg.key | sudo apt-key add -
sudo echo "deb http://apt.llvm.org/bionic/ llvm-toolchain-bionic-10 main
deb-src http://apt.llvm.org/bionic/ llvm-toolchain-bionic-10 main" > /etc/apt/sources.list.d/llvm.list
sudo apt-get update
sudo apt-get install clang-format-10
Visual Studio Code
In Visual Studio Code, you can install clang-format plugin (xaver.clang-format), which allows you to format files with clang-format (also supports format on save). See the plugin documentation for details.
Command Line
You can run clang-format from the command line.
clang-format -i <filename> # -i causes to do in-file changes
Pre-commit Hooks
The ZPC repository has a config-file for the pre-commit.org git hook system. With the pre-commit hooks, utilities such as clang-format and cmake-format will be run for all files before committing them to the repository.
The pre-commit hooks must be activated locally on your machine to work.
First, the pre-commit Python module has to be installed:
python -m pip install pre-commit
Second, install the git hook:
python -m pre-commit install
From now on, all new files will be formatted before they are committed.
Creating a New Application
Create a new folder in
applicationsfolder e.g.,applications/my_unify_application.Create a main function within the
applications/my_unify_applicationfolder.The following is an example of the bare minimum main.c file to get started. A more comprehensive demo is located in
applications/demo_uic_lib, where some of the shared Unify libraries are demonstrated as well, including MQTT client, logging, and the configuration system.#include "uic_main.h" #include "process.h" // Demo process definition PROCESS(my_unify_application_process, "My Unify Application Process"); // Demo process implementation PROCESS_THREAD(my_unify_application_process, ev, data) { PROCESS_BEGIN() while (1) { switch (ev) { case PROCESS_EVENT_INIT: // Add Init code here break; case PROCESS_EVENT_EXIT: // Add Exit code here break; } PROCESS_WAIT_EVENT(); } PROCESS_END() } // Setup fixture, called on start-up sl_status_t my_unify_application_setup(void) { // Start the demo process process_start(&my_unify_application_process, NULL); return SL_STATUS_OK; } int main(int argc, char **argv) { // Setup fixtures uic_fixt_setup_step_t uic_fixt_setup_steps_list[] = {{my_unify_application_setup, "My Unify Application"}, {NULL, "Terminator"}}; // Shutdown fixtures uic_fixt_shutdown_step_t uic_fixt_shutdown_steps_list[] = {{NULL, "Terminator"}}; // Run uic_main and return result return uic_main(uic_fixt_setup_steps_list, uic_fixt_shutdown_steps_list, argc, argv, "1.0" /* My application version */); }
Hook
my_unify_applicationinto the Build System.After adding the main function to a
main.cfile underapplications/my_unify_application, modify the cmake configuration file to includemy_unify_applicationin the build by addingadd_subdirectory(my_unify_application)toapplications/CMakeLists.txtadd_executable(my_unify_application main.c) target_link_libraries(my_unify_application unify) # Include my_unify_application in binary package install(TARGETS my_unify_application RUNTIME DESTINATION bin)
Compile
Now, everything should be set up to compile my_unify_application as part of the Unify build. To cross compile the application for Raspberry Pi, run the following commands in the root of the source folder:
NB: Prerequisite is to have the Unify docker image (see Docker)
docker run -it --rm  -v`pwd`:`pwd` -w `pwd` uic_arm64
mkdir build
cd build
cmake -GNinja -DCMAKE_TOOLCHAIN_FILE=../cmake/arm64_debian.cmake ..
ninja
ninja deb
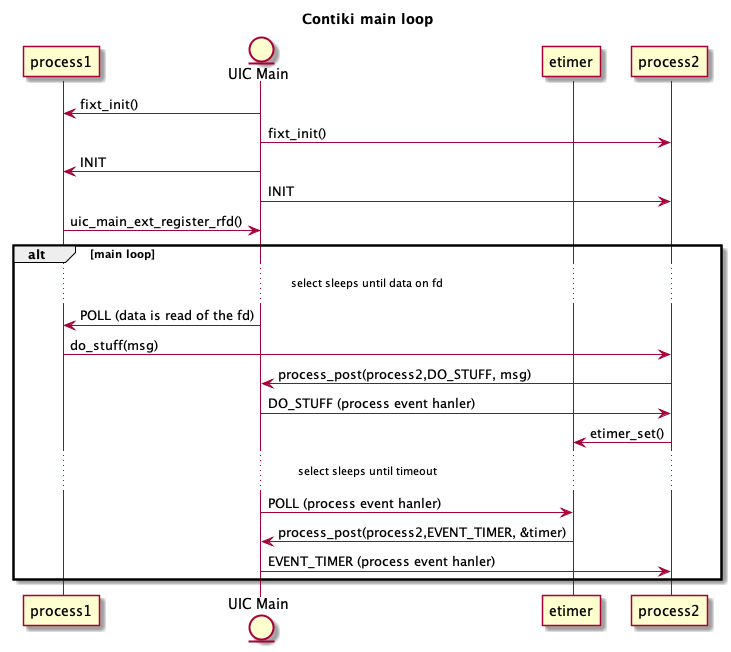
Unify Framework Library (Unify Main) and IPC
The Unify Framework library is implemented as an event-driven system. It runs in a single thread and uses the proto-threads from the Contiki OS as an event queue system. The event system is centered around a single select call, which monitors all external file descriptors and is responsible for triggering a timer, which is implemented in the Unify Main component. This design was chosen to avoid concurrency issues between threads.
The following sequence diagram shows how the Unify Main loop triggers events based on file descriptors in process1 and timers in process2.
Additional information on this is available in the Unify Library API