Getting Started with Unify using Portable runtime
With the Portable runtime, initiating the Unify Network requires minimal effort, whether through a graphical user interface (GUI) or a command-line interface (CLI).
Unify Portable Runtime Environment
Prerequisites:
Docker version > 20.10.12 installed.
docker-compose version > 2.5.1
x86-64/amd64 CPU architecture.
The Unify Portable Runtime Environment strives to get Unify running as fast as possible on your desktop. The portable runtime comes as a binary executable GUI, together with Unify Debian packages, a docker-compose file and a tool which can map a Silicon Labs device into a Linux docker environment on Windows and Linux.
Start docker service
Refer to Docker Service Pre-requisite.
Quick start
Note: If you are running Linux, you need the right permissions to run the Commander and Silink tools.
For handling these permissions, you either need to:
copy the Udev rules from
./resources/commander/99-jlink.rulesto the system folder/etc/udev/rules.d/and runsudo udevadm control --reload && sudo udevadm trigger.or
run all the commands as root with eg.
sudo ./unify_portable_gui.....
WARNING: If you start up the portable docker environment on a host already running Unify Framework applications, this will cause unexpected behavior.
Setting up the portable runtime environment should be as easy as downloading
portable_runtime_gui_<OS>.<zip/tar.bz2> file from the
Unify’s GitHub release page
and extracting it.
Portable Runtime GUI
Launching Portable Runtime GUI
After extraction, make sure you have modules connected to your desktop and run the binary unify_portable_gui.
This should launch up the Unify Portable Runtime GUI.
Note: The configuration pages have Back button to go to previous page and edit configurations made.
Protocol Selection
After initial pre-requisites check, the GUI will render protocol selection page.

By default only EED (Emulated End Device) is selected.
click on Next.
Emulated End Device (Experimental):
Portable runtime supports end device emulation as an experimental feature. The Emulated End Device (EED) is experimental emulation of end device to enable UMB demo without any actual Z-Wave devices.
Note: For UMB to process EED with only one cluster as a valid device enable atleast select NAL in the framework service page that follows.
The EED can be enabled in protocol selection page of latest portable runtime GUI.
Framework Services and Application Selection
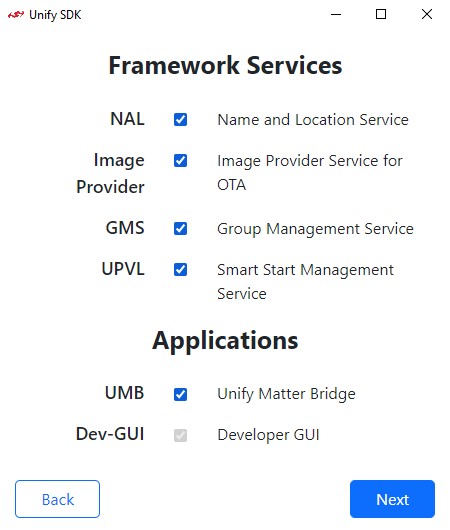
Select the framework services and the unify matter bridge application as needed and click Next.
Note: Dev-GUI Application will be enabled by default.
Configuration
Select the Device for each protocol selected in Protocol Selection page. If Z-Wave was selected then also configure RF Region.
If EED was selected then select preferred Device Type from the dropdown.
Select AllClustersDevice for all possible device types supported by EED.
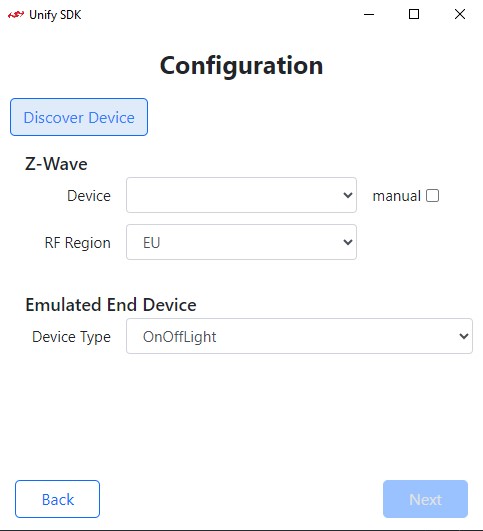
If the required device is not yet connected, connect the device to the host and click Discover Device for it to show up in the drop-down list.
If you wish manual input serial number or have connected the device remotely over ethernet and wish to input its IP address, tick the manual check box and type in the serial-no or IP address of the device.
After setting up configurations, click Next.
Review Configuration:
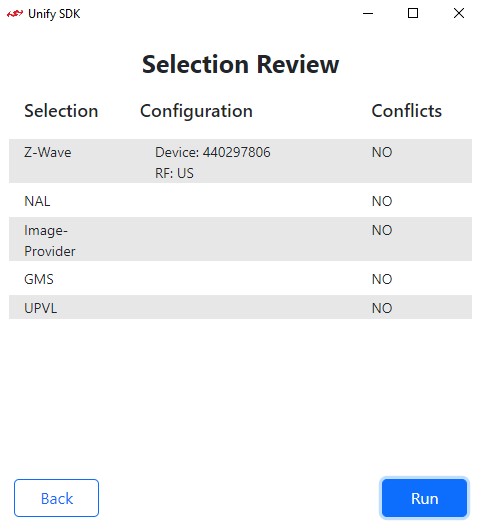
This page is for users to review the selections and configurations that has been setup so far, if configuration looks good click Run else click Back to redo configuration setup.
Note: Currently the Conflicts do not indicate much, it is intended for future use.
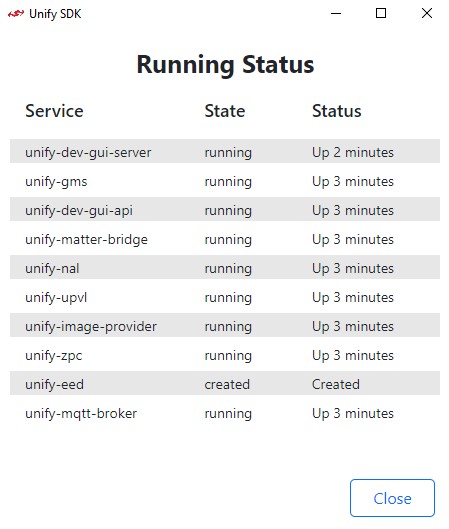
Running Status
Once Run is clicked on Review Configuration page, the selected protocol controllers and framework services bring-up within portable runtime environment starts. On successful bring up, the Status page is displayed which periodically renders the running status of each service.
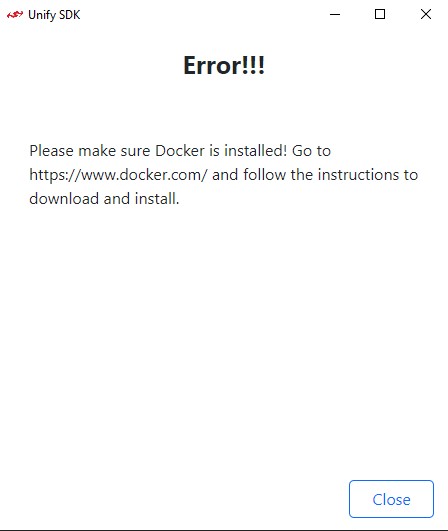
Error
In case of any issues in bring-up or pre-requisites check, error page is displayed with relevant message.
Portable Runtime CLI
Portable runtime CLI provides extra functionalities such as flash-app, read-dsk where as GUI lacks.
To run legacy combination of portable runtime with only ZPC
After extraction, make sure you only have a single Z-Wave module
connected to your desktop and run the binary unify_portable_cli.
This should set up the whole Unify Framework ecosystem.
An example of this can be seen below on a Windows machine.
PS C:\Users\someuser\Downloads\portable_runtime_windows> .\unify_portable_cli.exe -p "Z-Wave"
Verifying Docker installation
devices: 1 device found.

Identified as 440285211 Serial API Controller
Mapping device with Silink...
Building Unify Portable Runtime...
Building docker image with unify_1.3.1_x86_64.zip
Starting Unify Portable Runtime...
Unify is running!
Please visit http://localhost:3080 in your browser.
Change the 'Host' field to 'mqtt-broker' and press 'Connect'.

Press Ctrl-C to stop...
After starting the Portable Runtime, one can test it and control it with
the developer GUI on http://localhost:3080. Details on the developer GUI can
be found in the Dev GUI User’s Guide.
IMPORTANT: To connect the DevGUI to the correct MQTT broker, change
localhost to mqtt-broker.
Portable runtime combinations
Portable runtime environment now supports both ZPC and EED. It can even run EED individually or in combinations of ZPC and supported Applications. Also, now the portable runtime environment can be configured to run only the selected framework services.
Supported Protocol Controllers:
Z-Wave Protocol Controller (
ZPC)
Supported Applications:
Unify Matter Bridge (
UMB)Dev-GUI
Emulated End Device (EED)
Note: Dev-GUI Application will be always enabled by default.
Advanced options
To start up the environment, run the unify_portable_cli binary file. For combinations which require no device, you can just run the unify_portabke_cli application. For multiple connected devices or new protocol combinations, see below. Once it is running, it will wait for you to press ‘CTRL-C’ to end it.
unify_portable_cli
Protocol Controller Selection
The list of protocol controller to be run can be configured using this option. If this option is not configured by default only EED will be run within portable runtime environment.
The predefined strings are:
Z-Wavefor ZPC
unify_portable_cli -p "Z-Wave"
Framework Service Selections
The list of framework services to be run can be configured using this option. If this option cannot be used without protocol selection configuration.
The option takes a list of comma-separated predefined strings representing each supported framework service.
The predefined strings are:
NALfor Name And Location(NAL) ServiceImage-Providerfor Image Provider service used for OTAGMSfor Group Management Service(GMS)UPVLfor Unify Provisioning List Service
unify_portable_cli -p "Z-Wave" -m "NAL,GMS"
Unify Matter Bridge selection
The Unify Matter Bridge is a reference application that makes legacy devices, such as Z-Wave Devices accessible on a Matter fabric. It does so by acting as an IoT Service in a Unify Framework. Please visit Unify Matter Bridge for more details.
The Unify Matter Bridge can be configured to be run using -a option. This option cannot be used without a protocol selection configuration.
The option takes a predefined string “UMB” representing Unify Matter Bridge as shown below.
unify_portable_cli -a "UMB" -p "Z-Wave"
Upon successful bring up of portable runtime for Unify Matter Bridge,
it will be automatically commissioned by the chip-tool with Matter Fabric Node ID <1>.
To execute any chiptool commands, we should first access the unify matter bridge bash terminal using the below command.
docker exec -it unify-matter-bridge bash
To verify chip-tool successful commissioning
In the docker bash terminal, execute the below command, which lists all the bridged endpoints attached to the root node.
docker> chip-tool descriptor read parts-list 1 0
In successful commissioning case, the above command will give output as below:
1701842598.849635][1288:1290] CHIP:DMG: ReportDataMessage =
[1701842598.849653][1288:1290] CHIP:DMG: {
[1701842598.849667][1288:1290] CHIP:DMG:        AttributeReportIBs =
[1701842598.849690][1288:1290] CHIP:DMG:        [
[1701842598.849707][1288:1290] CHIP:DMG:                AttributeReportIB =
[1701842598.849731][1288:1290] CHIP:DMG:                {
[1701842598.849750][1288:1290] CHIP:DMG:                        AttributeDataIB =
[1701842598.849771][1288:1290] CHIP:DMG:                        {
[1701842598.849793][1288:1290] CHIP:DMG:                                DataVersion = 0x43ceb2aa,
[1701842598.849815][1288:1290] CHIP:DMG:                                AttributePathIB =
[1701842598.849837][1288:1290] CHIP:DMG:                                {
[1701842598.849861][1288:1290] CHIP:DMG:                                        Endpoint = 0x0,
[1701842598.849885][1288:1290] CHIP:DMG:                                        Cluster = 0x1d,
[1701842598.849909][1288:1290] CHIP:DMG:                                        Attribute = 0x0000_0003,
[1701842598.849932][1288:1290] CHIP:DMG:                                }
[1701842598.849955][1288:1290] CHIP:DMG:
[1701842598.849977][1288:1290] CHIP:DMG:                                Data = [
[1701842598.850003][1288:1290] CHIP:DMG:                                                1, 2,
[1701842598.850028][1288:1290] CHIP:DMG:                                ],
[1701842598.850049][1288:1290] CHIP:DMG:                        },
[1701842598.850072][1288:1290] CHIP:DMG:
[1701842598.850091][1288:1290] CHIP:DMG:                },
[1701842598.850113][1288:1290] CHIP:DMG:
[1701842598.850129][1288:1290] CHIP:DMG:        ],
[1701842598.850152][1288:1290] CHIP:DMG:
[1701842598.850170][1288:1290] CHIP:DMG:        SuppressResponse = true,
[1701842598.850187][1288:1290] CHIP:DMG:        InteractionModelRevision = 11
[1701842598.850203][1288:1290] CHIP:DMG: }
[1701842598.850383][1288:1290] CHIP:TOO: Endpoint: 0 Cluster: 0x0000_001D Attribute 0x0000_0003 DataVersion: 1137619626
[1701842598.850442][1288:1290] CHIP:TOO:   PartsList: 2 entries
[1701842598.850462][1288:1290] CHIP:TOO:     [1]: 1
[1701842598.850479][1288:1290] CHIP:TOO:     [2]: 2
PartsList will only have entry <1>, when no bridged nodes are attached.
PartsList will only have entries <1>,<2>, when 1 bridged endpoint is attached.(shown in above example)
In this case, <2> will be the bridged endpoint id for attached Unify End-Device w.r.t chip-tool.PartsList will only have entries <1>,<2>,<3> when 2 bridged endpoints are attached and so on.
In case of commissioning failure, we observe CHIP Error 0x00000032: Timeout as output for above command.
To operate end point via unify matter bridge from matter fabric
First, add a device with clusters supported by unify matter bridge to the protocol controller. Unify matter bridge supported clusters can be seen in this link. After successful addition of device, we can see new bridged endpoint added to the list on the unify matter bridge using the commands mentioned above.
We can see the capabilities of the newly added bridged endpoint on unify matter bridge using the below command in bash terminal.
Note: bridged endpoint id in below command, can be obtained from the above parts-list command.
docker> chip-tool descriptor read device-type-list 1 <bridged endpoint id>
Now, we can use chip-tool commands in bash terminal to operate the device.
For example, To send an OnOff cluster Toggle command to a bridged endpoint with id 2, via Matter Fabric Node ID 1
docker> chip-tool onoff toggle 1 2
More detailed information about chip-tool can be found in this link
Emulated End Device (Experimental)
Note: For UMB to process EED with only one cluster as a valid device enable atleast NAL along with EED
The Emulated End Device(EED) can be configured to be run using -a option. This option cannot be used without a protocol selection configuration.
The option takes a predefined string “EED” representing Emulated End Device as shown below.
unify_portable_cli -a "EED,UMB" -m "NAL"
The EED can be configured to bring up with desired device type using --eed_device_type. Supported device types: dimmablelight, onofflight, doorlock, onofflightswitch, lightsensor, occupancysensor, onoffpluginunit, dimmablepluginunit, extendedcolorlight, windowcovering, thermostat, flowsensor, allclustersdevice. Use –eed_device_type “allclustersdevice” for all supported clusters.
If --eed_device_type is not configured by default EED is up with onofflight device type.
unify_portable_cli -a "EED,UMB" -m "NAL" --eed_device_type "allclustesdevice"
Z-Wave options
Z-Wave RF Region
The Z-Wave controller will default to running the EU region setting.
A command-line switch is available to choose a different region from the region list EU, US, US_LR, ANZ, HK, MA, IN, IS, RU, CN, JP, KR.
Here is an example on how to start it up in the US region.
unify_portable_cli -p "Z-Wave" --zwave-rf-region US
Serial no
Specifying the device’s serial no. that you would like to use, can be done like so:
unify_portable_cli -p "Z-Wave" --serial-no 440262195
Be aware that running it like this on Linux, requires libqt5network5 to be installed. For Debian based distro, it can be installed like so:
user@portable_runtime_environment:~$ sudo apt install -y --no-install-recommends libqt5network5
IP address
If you have eg. a WSTK board connected to the same network, you can specify its IP address like so:
unify_portable_cli -p "Z-Wave" --ip-address 10.0.0.12
Direct device
This method is only supported on Linux. By specifying the device path, you can map that device into the portable runtime.
user@portable_runtime_environment:~$ unify_portable_cli p "Z-Wave" --device /dev/ttyUSB0.
Multiple devices connected
Having multiple Thunderboard or WSTK boards connected via USB, you will have to specify which of the devices to use. This can be done by providing the path to a serial device, a serial number or an IP address of the device which can run the respective controller.
For ZPC:
If you do not specify a serial number, the portable runtime will attempt to
identify the controller device based on its application name. If that fails,
you will be asked to select the controller from a the list of the connected
devices.
unify_portable_cli -p "Z-Wave" -m "UPVL,GMS,NAL"
Verifying Docker installation
devices: 2 devices found.
0: 440297793, J-Link EnergyMicro
0: 440206482, J-Link EnergyMicro

Attempting to identify the Serial API Controller...
Identification failed.
Serial number is not specified.

Device No. | Serial No. | Board No. | Freq. | Application name
-----------+------------+-----------+-------+------------------------------
         0 | 440297793  | 224710182 | ?     | unknown
         1 | 440206482  | 204705627 | ?     | unknown

Please select a device for Z-Wave.
Note that the device's number may change when multiple boards are connected!
Type 0, 1, ... or x to cancel:
For rest of the protocols:
If you do not specify a serial number, you will be asked to select the controller from a the list of the connected devices.
unify_portable_cli -p "Z-Wave" -m "UPVL,GMS,NAL"
Verifying Docker installation
devices: 2 devices found.
0: 440297793, J-Link EnergyMicro
0: 440206482, J-Link EnergyMicro

Attempting to identify the Serial API Controller...
Identification failed.
Serial number is not specified.

Device No. | Serial No. | Board No. | Freq. | Application name
-----------+------------+-----------+-------+------------------------------
         0 | 440297793  | 224710182 | ?     | unknown
         1 | 440206482  | 204705627 | ?     | unknown

Please select a device for Z-Wave.
Note that the device's number may change when multiple boards are connected!
Type 0, 1, ... or x to cancel:
Note: When multiple protocols are selected and multiple devices are connected, after a device selected on above prompt for a protocol, it will not be displayed again in the next prompt for another protocol to avoid conflict between two PC configuration.
Troubleshooting
In case you run into any issues, a log file is produced in the base directory, called portable_runtime.log.
Additional subcommands
The portable runtime CLI includes additional convenience functions that allow you to flash the application firmwares, query the DSK values, and list other details of connected devices.
Flash application
It is possible to flash the devices with the flash-app subcommand. To get help
on how to use this subcommand, use the -h switch:
unify_portable_cli flash-app -h
The package contains several pre-built application firmwares. It is possible to
flash the pre-built applications using the -n flag and one of the following
names:
multilevel-sensor, power-strip, sensor-pir, serial-api, switch-on-off,
and wall-controller.
unify_portable_cli -s 440262211 flash-app -n switch-on-off
Or a relative path can be specified as an argument for an arbitrary application firmware using the -p flag.
unify_portable_cli -s 440262176 flash-app -u zwave_soc_switch_on_off-brd2603a-us.hex
Specifying the serial number is not required - in that case you will be asked to select the device that you want to flash.
If the RF region is not defined by the --zwave-rf argument, then default value will be flashed (EU). It is possible to define the rf-region to be flashed to device from the region list: EU, US, US_LR, ANZ, HK, MA, IN, IS, RU, CN, JP, KR.
unify_portable_cli --zwave-rf US_LR -s 440262138 flash-app -n switch-on-off
After the application firmware is flashed to the device, the DSK of the End Device will be printed. Note: In case of flashing serial-api, there is no DSK.
Read Device Specific Key (DSK)
The read-dsk subcommand prints the DSK of a device. This DSK value can be used for secure inclusion.
The device to be queried can be selected from the list of devices interactively,
or by specifying the serial number -s flag before the subcommand.
unify_portable_cli -s 440262138 read-dsk
List connected devices
The list-devices subcommand allows to query the serial number, board number,
configured radio region, and application name of the connected devices, and can
be invoked as follows:
unify_portable_cli list-devices
Troubleshooting
In case you want to use different version of UnifySDK or UMB, replace desired packages in portable_runtime_
In case you run into any issues, a log file is produced in the base directory, called portable_runtime.log.