Guideline for implementing Command Classes
This guide is meant to guide you to implement a new Z-Wave command class in Unify. We’ll go trough step by step following a real example : implementing the Sound Switch command class.
The following schema shows you a top level view of all the components we are using :
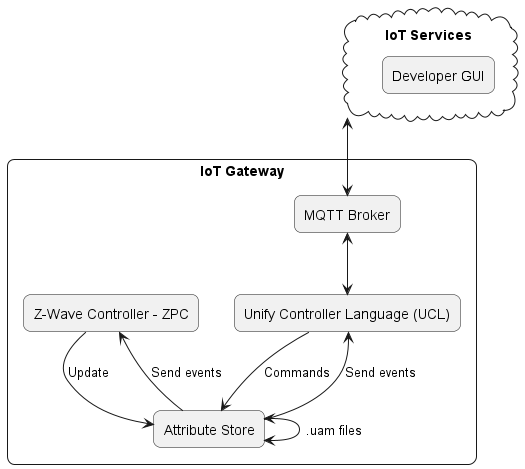
The Z-Wave controller handles the Z-Wave commands and update the attribute store if needed.
The UCL updates the Attribute Store though commands.
The Attribute Store send events to :
The attributes monitored by the Z-Wave controller
The attributes monitored by the UCL that triggers MQTT Broker messages.
The .uam files allow to automatically update UCL attributes when Z-Wave attributes changes and vice versa.
Note
If you want the simplest example of a command class implementation you can look at the Alarm Sensor command class.
Defining the Z-Wave Command Class attribute state data model
The first step is to define the data model of the Z-Wave Command Class attributes state. The Z-Wave command class specification is the better starting point. If you don’t have access to it the Z-Wave PC Controller tool can show you each commands for each command class, but without specifics. The goal is to look at different commands (get/set/report) and see which attributes are worth saving.
A good approach is to also make sure that you can self-certify your command class with the Compliance Test Tool (CTT) proposed by the Z-Wave alliance. You can find out more about that in the Z-Wave Compliance Test Tool (CTT) section. We recommend to validate your implementation against the CTT tool if applicable.
Note
All commands classes are not available in CTT. You also have to be an alliance member to access the tool.
The Z-Wave End Device Emulator is accessible to anyone and is able to emulate an End Device and test your implementation against it.

Most of the commands should be already defined in ZW_classcmd.h. Not
that this file might not contains all the definitions you need, but you
can look in the GSDK folder that contains the same file but more up to
date. Simply copy the attributes and commands you need in the local
ZW_classcmd.h.
Note
Don’t replace the new file by the old one as you might have some incompatibilities with the current command classes.
Based on the commands we need the following attributes :
Attribute |
Description |
Associated command |
|---|---|---|
Tone number |
Supported tone number count |
Tones Number |
Configured volume |
Current default volume on the device |
Configuration |
Configured tone |
Current default tone on the device |
Configuration |
Tone Identifier |
One for each tone number reported |
Tone Info |
Tone info name |
Tone Description (under each Tone Identifier) |
Tone Info |
Tone info duration |
Tone Duration (under each Tone Identifier) |
Tone Info |
Play |
The tone ID that the device plays. 0 to stop, 255 to play the default tone (Configuration command) and 1-254 to play a specific tone |
Play |
With those attributes we cover all the commands needs. The following schema illustrates the attributes we use in our Sound Switch command class implementation :
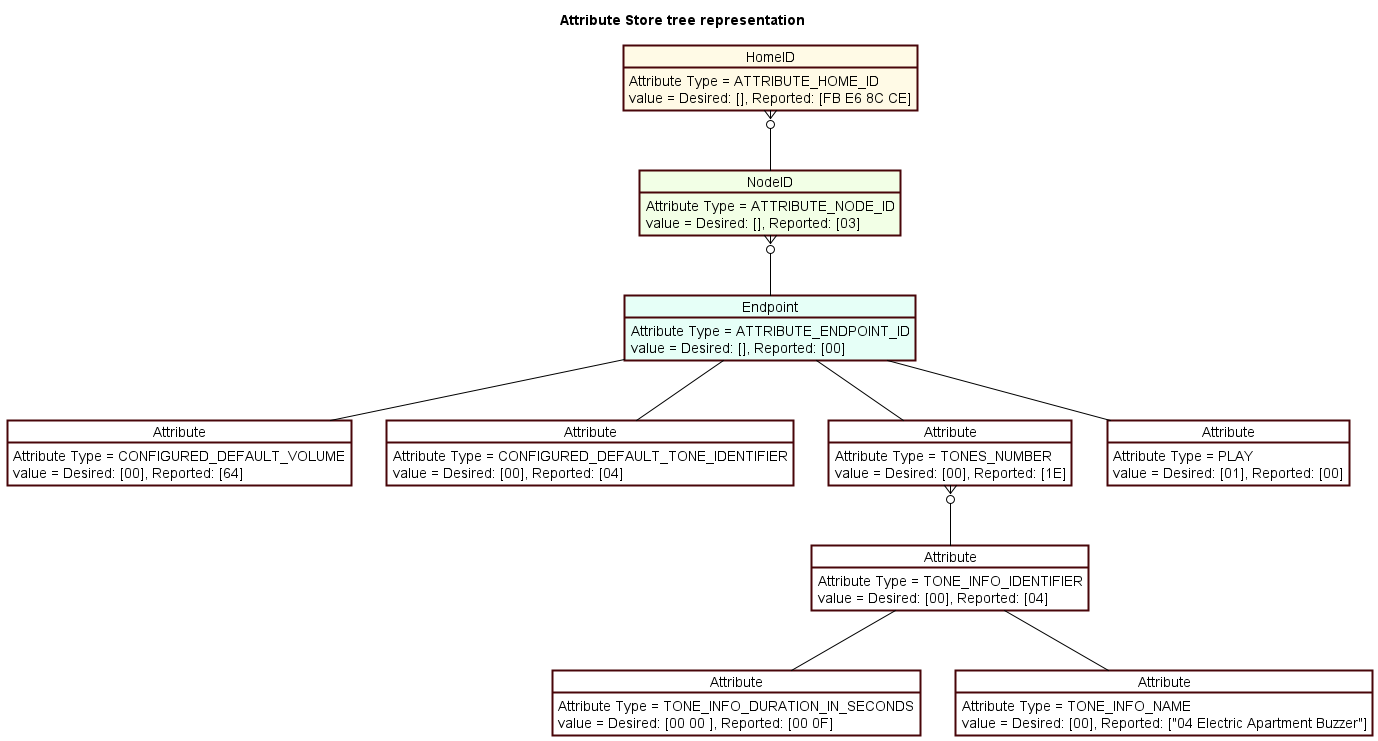
Each attribute in our Attribute Store triggers Z-Wave commands.
We use a TONE_INFO_IDENTIFIER as a parent of TONE_INFO_DURATION
and TONE_INFO_NAME because they are directly related. The Z-Wave
specification tells us to send a Tone Info Get for each reported
Tones Number. This way we can create as many TONE_INFO_IDENTIFIER
node as needed.
The TONE_INFO_IDENTIFIER triggers a Tone Info command while
CONFIGURED_DEFAULT_TONE_IDENTIFIER triggers a Configuration command.
In the attribute store attributes has two states : defined and reported.
If the reported value is missing, the controller sends a GET command to gather the reported value.
If the defined value is set, the controller sends a SET command to set the desired value.
This mapping is explained in Get/Set command section.
Create the data model in the Attribute Store
After defining the data model, the next step is to define the type of each node in the attribute store.
In
applications\zpc\components\zpc_attribute_store\include\command_class_types
create an header that defines the types used in command class
implementation. The naming convention is
zwave_command_class_{COMMAND_CLASS_NAME}.h
///> Tone identifier. uint8_t
typedef uint8_t sound_switch_tone_id_t;
///> Tone duration. uint16_t
typedef uint16_t sound_switch_tone_duration_t;

///> Volume representation. uint8_t
typedef uint8_t sound_switch_volume_t;
You might want to update this file as you are writing the logic. Here we defined 3 attributes we use often in the Sound Switch class : the tone identifier, the tone duration and the volume.
Attribute definition
Then we need to create the attributes of command class to register them
later in the attribute store. This is done in the
attribute_store_defined_attribute_types.h header.
To add an attribute you can use the DEFINE_ATTRIBUTE macro. Each
attribute should have an unique ID on 16 bits :
[COMMAND_CLASS_ID][UNIQUE_ATTRIBUTE_ID]
[0x79][0x01]
Where COMMAND_CLASS_ID is the command class ID (found in
ZW_classcmd.h) and UNIQUE_ATTRIBUTE_ID is an arbitrary and
unique ID to the command class.
The first attribute you have to declare is the supported version :
/// zwave_cc_version_t
DEFINE_ATTRIBUTE(ATTRIBUTE_COMMAND_CLASS_SOUND_SWITCH_VERSION,
                 ZWAVE_CC_VERSION_ATTRIBUTE(COMMAND_CLASS_SOUND_SWITCH))
The ZWAVE_CC_VERSION_ATTRIBUTE macro set the unique attribute ID to
0x01. So you have to start your custom attribute listing to 0x02. We can
define CONFIGURED_DEFAULT_VOLUME like :
// Configured volume for the Sound Switch
DEFINE_ATTRIBUTE(ATTRIBUTE_COMMAND_CLASS_SOUND_SWITCH_CONFIGURED_DEFAULT_VOLUME,
                 ((COMMAND_CLASS_SOUND_SWITCH << 8) | 0x02))
ATTRIBUTE_COMMAND_CLASS_SOUND_SWITCH_CONFIGURED_DEFAULT_VOLUME has
an ID of 0x7902. This is used latter for mapping the attribute store
Z-Wave attributes to the Dot Dot model.
A complete definition of our classes attribute can be found bellow :
/////////////////////////////////////////////////
// Sound Switch Command Class
///< This represents the version of the Sound Switch Command class.
/// zwave_cc_version_t
DEFINE_ATTRIBUTE(ATTRIBUTE_COMMAND_CLASS_SOUND_SWITCH_VERSION,
                 ZWAVE_CC_VERSION_ATTRIBUTE(COMMAND_CLASS_SOUND_SWITCH))
// Configured volume for the Sound Switch
DEFINE_ATTRIBUTE(ATTRIBUTE_COMMAND_CLASS_SOUND_SWITCH_CONFIGURED_DEFAULT_VOLUME,
                 ((COMMAND_CLASS_SOUND_SWITCH << 8) | 0x02))
// Configured tone for the Sound Switch
DEFINE_ATTRIBUTE(
  ATTRIBUTE_COMMAND_CLASS_SOUND_SWITCH_CONFIGURED_DEFAULT_TONE_IDENTIFIER,
  ((COMMAND_CLASS_SOUND_SWITCH << 8) | 0x03))
// Number of tones supported by the receiving node
DEFINE_ATTRIBUTE(ATTRIBUTE_COMMAND_CLASS_SOUND_SWITCH_TONES_NUMBER,
                 ((COMMAND_CLASS_SOUND_SWITCH << 8) | 0x04))
DEFINE_ATTRIBUTE(ATTRIBUTE_COMMAND_CLASS_SOUND_SWITCH_TONE_INFO_IDENTIFIER,
                 ((COMMAND_CLASS_SOUND_SWITCH << 8) | 0x05))
DEFINE_ATTRIBUTE(ATTRIBUTE_COMMAND_CLASS_SOUND_SWITCH_TONE_INFO_DURATION_IN_SECONDS,
                 ((COMMAND_CLASS_SOUND_SWITCH << 8) | 0x06))
DEFINE_ATTRIBUTE(ATTRIBUTE_COMMAND_CLASS_SOUND_SWITCH_TONE_INFO_NAME,
                 ((COMMAND_CLASS_SOUND_SWITCH << 8) | 0x07))
// Command is used to instruct a supporting node to play (or stop playing) a tone.
DEFINE_ATTRIBUTE(ATTRIBUTE_COMMAND_CLASS_SOUND_SWITCH_TONE_PLAY,
                 ((COMMAND_CLASS_SOUND_SWITCH << 8) | 0x08))
Attribute registration
Now that we have all our attributes defined we must register them in the
attribute store. We can do that in the
zpc_attribute_store_type_registration.cpp file.
You just need to add an new entry with :
Our attribute store name defined in
attribute_store_defined_attribute_types.hA const String description of the attribute
The parent node. In most cases it is the
ATTRIBUTE_ENDPOINT_ID, but you can set it to another attribute if needed. The more attributes we put under the endpoint the poorer performance.The type of the attribute. The complete enum can be found in
components/uic_attribute_store/include/attribute_store_type_registration.h. If set the engine validates the value you try to write in it and raise an error if types are incompatible.
{ATTRIBUTE_COMMAND_CLASS_SOUND_SWITCH_VERSION, "Sound Switch Version", ATTRIBUTE_ENDPOINT_ID, U8_STORAGE_TYPE},
The full sample can be found bellow :
/////////////////////////////////////////////////////////////////////
//         Sound Switch Command Class attributes
/////////////////////////////////////////////////////////////////////
{ATTRIBUTE_COMMAND_CLASS_SOUND_SWITCH_VERSION,   "Sound Switch Version",   ATTRIBUTE_ENDPOINT_ID,   U8_STORAGE_TYPE},
{ATTRIBUTE_COMMAND_CLASS_SOUND_SWITCH_CONFIGURED_DEFAULT_VOLUME,   "Configured Default Volume",   ATTRIBUTE_ENDPOINT_ID,   U8_STORAGE_TYPE},
{ATTRIBUTE_COMMAND_CLASS_SOUND_SWITCH_CONFIGURED_DEFAULT_TONE_IDENTIFIER,   "Configured Default Tone Identifier",   ATTRIBUTE_ENDPOINT_ID,   U8_STORAGE_TYPE},
{ATTRIBUTE_COMMAND_CLASS_SOUND_SWITCH_TONES_NUMBER,   "Tones Number",   ATTRIBUTE_ENDPOINT_ID,   U8_STORAGE_TYPE},

{ATTRIBUTE_COMMAND_CLASS_SOUND_SWITCH_TONE_INFO_IDENTIFIER,   "Tone Info Identifier",  ATTRIBUTE_COMMAND_CLASS_SOUND_SWITCH_TONES_NUMBER,   U8_STORAGE_TYPE},

{ATTRIBUTE_COMMAND_CLASS_SOUND_SWITCH_TONE_INFO_DURATION_IN_SECONDS,   "Tone Info Duration (seconds)",   ATTRIBUTE_COMMAND_CLASS_SOUND_SWITCH_TONE_INFO_IDENTIFIER,   U16_STORAGE_TYPE},
{ATTRIBUTE_COMMAND_CLASS_SOUND_SWITCH_TONE_INFO_NAME,   "Tone Info Name",   ATTRIBUTE_COMMAND_CLASS_SOUND_SWITCH_TONE_INFO_IDENTIFIER,   C_STRING_STORAGE_TYPE},

{ATTRIBUTE_COMMAND_CLASS_SOUND_SWITCH_TONE_PLAY, "Tone Play", ATTRIBUTE_ENDPOINT_ID, U8_STORAGE_TYPE},
You can see that
ATTRIBUTE_COMMAND_CLASS_SOUND_SWITCH_TONE_INFO_DURATION_IN_SECONDS
and ATTRIBUTE_COMMAND_CLASS_SOUND_SWITCH_TONE_INFO_NAME parents are
ATTRIBUTE_COMMAND_CLASS_SOUND_SWITCH_TONE_INFO_IDENTIFIER and not
ATTRIBUTE_ENDPOINT_ID. This is because those parameters depends
directly on the value
ATTRIBUTE_COMMAND_CLASS_SOUND_SWITCH_TONE_INFO_IDENTIFIER and we do
not want to surcharge our endpoint tree.
Write the logic of the command class
Base skeleton creation
Now that our attributes are known to the Attribute Store we can start implementing our command class logic.
You can create a new header in
applications\zpc\components\zwave_command_classes\src with the
following name pattern : zwave_command_class_{COMMAND_CLASS_NAME}.h
where {COMMAND_CLASS_NAME} is your Z-Wave command class name. In our
example our new header is : zwave_command_class_sound_switch.h
Repeat this process for the source file. Note that you can use either
.c or .cpp file as long as your header is C compatible. For
our example we create the file zwave_command_class_sound_switch.c.
We need to add the source file to the CMakeLists.txt located in
applications\zpc\components\zwave_command_classes\ :
add_library(
  zwave_command_classes
  platform/-{COMPATIBLE_PLATFORM}/platform_date_time.c
  platform/-{COMPATIBLE_PLATFORM}/platform_exec.c

  //...

  src/zwave_command_class_sound_switch.c

  //...

  src/zwave_command_class_transport_service.c)
This ensures that our new file is correctly added to the build system. No need to include the header.
We recommend to fill your new header file with the contents of existing command classes header. Doxygen documentation is based on the structure of this header to create the section about the new command class.
We need at least one function to act as an entry point. The naming
convention is zwave_command_class_{class_name}_init, where
{class_name} is the current Z-Wave class name. In our example we
declare the function zwave_command_class_sound_switch_init. Our
zwave_command_class_sound_switch.h should look like that :
/**
 * @defgroup zwave_command_class_sound_switch
 * @brief Sound Switch Command Class handlers and control function
 *
 * This module implement some of the functions to control the
 * Sound Switch Command Class
 *
 * @{
 */

#ifndef ZWAVE_COMMAND_CLASS_SOUND_SWITCH_H
#define ZWAVE_COMMAND_CLASS_SOUND_SWITCH_H

#include "sl_status.h"

#ifdef __cplusplus
extern "C" {
#endif

sl_status_t zwave_command_class_sound_switch_init();

#ifdef __cplusplus
}
#endif

#endif  //ZWAVE_COMMAND_CLASS_SOUND_SWITCH_H
/** @} end zwave_command_class_sound_switch */
For now we fill our source file with an empty definition :
// System
#include <stdlib.h>

#include "zwave_command_class_sound_switch.h"
#include "zwave_command_classes_utils.h"
#include "ZW_classcmd.h"

// Includes from other ZPC Components
#include "zwave_command_class_indices.h"
#include "zwave_command_handler.h"
#include "zwave_command_class_version_types.h"
#include "zpc_attribute_store_network_helper.h"
#include "attribute_store_defined_attribute_types.h"

// Unify
#include "attribute_resolver.h"
#include "attribute_store.h"
#include "attribute_store_helper.h"
#include "sl_log.h"

#define LOG_TAG "zwave_command_class_sound_switch"


sl_status_t zwave_command_class_sound_switch_init()
{
  return SL_STATUS_OK;
}
Note that some header were also added to the skeleton. They are here for later, but feel free to remove the unused ones when you are finished.
The LOG_TAG should be used when calling sl_log_xxx() function
(sl_log_warning(LOG_TAG, "My warning");). This ensure that all
messages that comes from this class is under the same tag. This is
useful to filter logs based on the component we are interested in.
Now that we have our entry point we have to call it in the
zwave_command_class_fixt.c file. First we need to include our header
and then call it from the function zwave_command_classes_init() :
// ...
#include "zwave_command_class_sound_switch.h"
// ...

sl_status_t zwave_command_classes_init()
{
  sl_status_t status = SL_STATUS_OK;

  // Special handlers:
  status |= zwave_command_class_granted_keys_resolver_init();
  status |= zwave_command_class_node_info_resolver_init();

  // Do not abort initialization of other CCs if one fails.
  // Command Class handlers
  // Note: AGI should stay first, it allows others to register commands.
  status |= zwave_command_class_agi_init();

  // ...
  status |= zwave_command_class_sound_switch_init();
  // ...

  zwave_command_handler_print_info(-1);
  return status;
}
Now that our skeleton is up and running we can start implement our new command class.
Implementation
Global handler
Let’s populate our initialization function
(zwave_command_class_sound_switch_init). The first thing to do is to
add an command handler :
sl_status_t zwave_command_class_sound_switch_init()
{
  zwave_command_handler_t handler = {};
  handler.support_handler         = NULL;
  handler.control_handler = NULL;
  handler.minimal_scheme  = ZWAVE_CONTROLLER_ENCAPSULATION_NONE;
  handler.manual_security_validation = false;
  handler.command_class              = COMMAND_CLASS_SOUND_SWITCH;
  handler.version                    = SOUND_SWITCH_VERSION;
  handler.command_class_name         = "Sound Switch";
  handler.comments                   = "";

  return zwave_command_handler_register_handler(handler);
}
This snippet registers the handler for your Z-Wave command class. The handler options are :
support_handler : Support handler for the Z-Wave command class. This allows you to react when receiving Get/Set commands. Some example of this handler can be found in already implemented command classes (
indicator,powerlevel,inclusion_controller, …).control_handler : Control handler for the Z-Wave command class. This allows you to react to Report commands.
minimal_scheme : The minimal security level which this command is supported on. This is ignored for the control_handler.
manual_security_validation : Use manual-security filtering for incoming frames. If set to true, the command class dispatch handler send frames to the handler without validating their security level.If set to false, the command class handler can assume that the frame has been received at an approved security level.
command_class : command class ID that this handler implements
version : Maximal version supported of the command class
command_class_name : Description of the current command class (no need to include “Command class”)
comments : Comments about the implementation. It is printed to the log when starting the zpc component.
Now that we have an handler, let’s implement the get/set/report command
classes for Configuration.
Initialize attributes
One of the first thing the controller is doing is to update the version
attribute. That’s why the version attribute always has an unique
attribute ID of 0x01. You can subscribe to changes to an attribute with
the attribute_store_register_callback_by_type. This is also the best
place to initialize your attributes.
The attribute_store_register_callback_by_type function takes 2
arguments :
A callback function that takes two arguments :
attribute_store_node_t updated_node : The node ID of the attribute
attribute_store_change_t change : Type of change
The attribute to monitor. In our case
ATTRIBUTE_COMMAND_CLASS_SOUND_SWITCH_VERSION.
We can call this function in our entrypoint
zwave_command_class_sound_switch_init before the handler definition
:
sl_status_t zwave_command_class_sound_switch_init()
{
  attribute_store_register_callback_by_type(
    &zwave_command_class_sound_switch_on_version_attribute_update,
    ATTRIBUTE_COMMAND_CLASS_SOUND_SWITCH_VERSION);

  // ...
  // handler definition
  // ...

  return zwave_command_handler_register_handler(handler);
}
This calls
zwave_command_class_sound_switch_on_version_attribute_update on each
update of ATTRIBUTE_COMMAND_CLASS_SOUND_SWITCH_VERSION.
Our implementation of
zwave_command_class_sound_switch_on_version_attribute_update look
like this :
static void zwave_command_class_sound_switch_on_version_attribute_update(
  attribute_store_node_t updated_node, attribute_store_change_t change)
{
  if (change == ATTRIBUTE_DELETED) {
    return;
  }

  zwave_cc_version_t version = 0;
  attribute_store_get_reported(updated_node, &version, sizeof(version));

  if (version == 0) {
    return;
  }

  attribute_store_node_t endpoint_node
    = attribute_store_get_first_parent_with_type(updated_node,
                                                 ATTRIBUTE_ENDPOINT_ID);

  // The order of the attribute matter since it defines the order of the
  // Z-Wave get command order.
  const attribute_store_type_t attributes[]
    = {ATTRIBUTE_COMMAND_CLASS_SOUND_SWITCH_TONES_NUMBER,
      ATTRIBUTE_COMMAND_CLASS_SOUND_SWITCH_CONFIGURED_DEFAULT_VOLUME,
      ATTRIBUTE_COMMAND_CLASS_SOUND_SWITCH_CONFIGURED_DEFAULT_TONE_IDENTIFIER,
      ATTRIBUTE_COMMAND_CLASS_SOUND_SWITCH_TONE_INFO_IDENTIFIER,
      ATTRIBUTE_COMMAND_CLASS_SOUND_SWITCH_TONE_PLAY};

  attribute_store_add_if_missing(endpoint_node,
                                 attributes,
                                 COUNT_OF(attributes));
}
The change attribute tells you which operation is currently
performed on this attribute (deleted, added or modified). We then try to
get the version from the attribute store. It is possible that we don’t
have the value reported yet, so we simply return and do nothing. If we
have the version we can create the base structure of our attributes with
the attribute_store_add_if_missing function.
Note
We don’t define our attributes under the
ATTRIBUTE_COMMAND_CLASS_SOUND_SWITCH_TONE_INFO_IDENTIFIER, they
are created once they are reported. The
attribute_store_set_child_reported() function adds the attribute
in the tree if they are missing. You can check the details in
zwave_command_class_sound_switch_handle_tone_info_report
function.
Get/Set command
We’ll take the example of following commands : CONFIGURATION_GET and
CONFIGURATION_SET
We can easily map the set/get function to an attribute of the Attribute Store. Here we want to map the previously defined attributes :
ATTRIBUTE_COMMAND_CLASS_SOUND_SWITCH_CONFIGURED_DEFAULT_VOLUMEATTRIBUTE_COMMAND_CLASS_SOUND_SWITCH_CONFIGURED_DEFAULT_TONE_IDENTIFIER
Since they are both used in argument of the Z-Wave set.
We can do this with the attribute_resolver_register_rule function
that takes 3 arguments :
The attribute store identifier
The associated callback for set function (can be
NULL)The associated callback for get function (can be
NULL)
This function listen to changes on the given attributes and call the get/set functions accordingly :
Get function is called if we don’t have a reported value.
You can test this behavior with the ZPC command
ZPC> attribute_store_undefine_reported NodeID
Set function is called on desired value change.
You can test this behavior with the ZPC command
ZPC> attribute_store_set_desired NodeID.
Note
ZPC CLI is treated in the Testing our implementation section.
attribute_resolver_register_rule(
  ATTRIBUTE_COMMAND_CLASS_SOUND_SWITCH_CONFIGURED_DEFAULT_VOLUME,
  &zwave_command_class_sound_switch_configuration_set,
  &zwave_command_class_sound_switch_configuration_get);

attribute_resolver_register_rule(
  ATTRIBUTE_COMMAND_CLASS_SOUND_SWITCH_CONFIGURED_DEFAULT_TONE_IDENTIFIER,
  &zwave_command_class_sound_switch_configuration_set,
  &zwave_command_class_sound_switch_configuration_get);
Each attribute can have only one rule, but it is not necessary to register a rule for all the attributes. A rule is necessary only for attributes that are used from a set or/and get function.
The callbacks must take 3 arguments :
attribute_store_node_t node : Current node ID of the attribute that trigger this callback.
int8_t *frame : A pointer to the frame that will be sent. It has to be filled by the callback.
uint16_t *frame_length : A pointer to the frame length. It has to be filled by the callback.
The node ID can be visualized with the ZPC commands
attribute_store_log_xxx. Here is a truncated result of
ZPC> attribute_store_log_search Tone :
(1) Root node .................................................................     <> (<>)
    │───(2) HomeID ............................................................ [58,27,e5,fc] (<>)
    │   │───(8) NodeID ........................................................      3 (<>)
    │   │   │───(9) Endpoint ID ...............................................      0 (<>)
    │   │   │   │───(80) Configured Default Tone Identifier ...................      4 (<>)
    │   │   │   │───(81) Tones Number .........................................     30 (<>)
    │   │   │   │───(84) Tone Info Identifier .................................      4 (<>)
    │   │   │   │   │───(211) Tone Info Duration ..............................      1 (<>)
    │   │   │   │   │───(212) Tone Info Name .................................. "04 Electric Apartment Buzzer" (<>)
    │   │   │   │───(85) Tone Play ............................................      0 (<>)
The node ID is represented by the number between parenthesis. The node
argument has the ID of the monitored attribute. The first value correspond
to the reported value, and the value between parenthesis are the desired
value ((<>) means no desired value).
The
Tone Info Identifierattribute is bonded to a get only function. That means if the reported value is undefined (e.g at startup with an empty attribute store), this get callback will have its node argument set to 81.The
Configured Default Tone Identifierattribute is bonded to both get and set function. If something changes, the callback (set or get) will have its node argument set to 80.
The get function is the most straight forward : it doesn’t require any argument we only need to send the frame.
static sl_status_t zwave_command_class_sound_switch_configuration_get(
  attribute_store_node_t node, uint8_t *frame, uint16_t *frame_length)
{
  (void)node;  // unused.
  ZW_SOUND_SWITCH_CONFIGURATION_GET_FRAME *get_frame
    = (ZW_SOUND_SWITCH_CONFIGURATION_GET_FRAME *)frame;
  get_frame->cmdClass = COMMAND_CLASS_SOUND_SWITCH;
  get_frame->cmd      = SOUND_SWITCH_CONFIGURATION_GET;
  *frame_length       = sizeof(ZW_SOUND_SWITCH_CONFIGURATION_GET_FRAME);
  return SL_STATUS_OK;
}
The set function in the other hand is less straight forward : we have to
get the elements in the attribute store and give to the Z-Wave set
command.
static sl_status_t zwave_command_class_sound_switch_configuration_set(
  attribute_store_node_t node, uint8_t *frame, uint16_t *frame_length)
{
  sound_switch_configuration_t configuration = {};

  const attribute_store_node_t endpoint_id_node
    = attribute_store_get_first_parent_with_type(node, ATTRIBUTE_ENDPOINT_ID);

  get_configuration(endpoint_id_node, &configuration);

  ZW_SOUND_SWITCH_CONFIGURATION_SET_FRAME *set_frame
    = (ZW_SOUND_SWITCH_CONFIGURATION_SET_FRAME *)frame;
  set_frame->cmdClass              = COMMAND_CLASS_SOUND_SWITCH;
  set_frame->cmd                   = SOUND_SWITCH_CONFIGURATION_SET;
  set_frame->volume                = configuration.volume;
  set_frame->defaultToneIdentifier = configuration.tone;
  *frame_length = sizeof(ZW_SOUND_SWITCH_CONFIGURATION_SET_FRAME);
  return SL_STATUS_OK;
}
You can have a peek in the current attribute store by executing
ZPC> attribute_store_log_search Tone (more info on CLI in the
section Testing our implementation).
The following sample also has the result of
ZPC> attribute_store_log_search Volume :
│   │   │───(9) Endpoint ID ...............................................      0 (<>)
│   │   │   │───(75) Configured Default Volume ............................      1 (<>)
│   │   │   │───(80) Configured Default Tone Identifier ...................      4 (<>)
│   │   │   │───(81) Tones Number .........................................     1 (<>)
|   │   │   │   │───(84) Tone Info Identifier .................................      1 (<>)
|   │   │   │   │   │───(211) Tone Info Duration ..............................      10 (<>)
|   │   │   │   │   │───(212) Tone Info Name .................................. "01 Electric Apartment Buzzer" (<>)
|   |   │   │   │───(89) Tone Info Identifier .................................      2 (<>)
|   │   │   │   │   │───(214) Tone Info Duration ..............................      1312 (<>)
|   │   │   │   │   │───(215) Tone Info Name .................................. "02 Alarm Buzzer" (<>)
│   │   │   │───(85) Tone Play ............................................      1 (<>)
The node argument here is set to either the node ID of
Configured Default Volume (75) or
Configured Default Tone Identifier (80).
However we need to access both of those values. To do so we get
Endpoint ID node ID : this allows us to have access to all its
children.
The function
attribute_store_get_first_parent_with_type(node, ATTRIBUTE_ENDPOINT_ID)
searches for the first parent with ATTRIBUTE_ENDPOINT_ID type : here
it is the node (9).
Once we have the parent node ID, we can pass it to the
get_configuration() function that fetches the information we need :
typedef struct sound_switch_configuration {
  sound_switch_volume_t volume;
  sound_switch_tone_id_t tone;
} sound_switch_configuration_t;

static void get_configuration(attribute_store_node_t state_node,
                              sound_switch_configuration_t *configuration)
{
  attribute_store_node_t volume_node
    = attribute_store_get_first_child_by_type(state_node,
                                              ATTRIBUTE_COMMAND_CLASS_SOUND_SWITCH_CONFIGURED_DEFAULT_VOLUME);

  sl_status_t status = attribute_store_get_desired_else_reported(volume_node,
                              &configuration->volume,
                              sizeof(configuration->volume));
  if (status != SL_STATUS_OK) {
    configuration->volume = 0;
    sl_log_warning(LOG_TAG, "Can't get CONFIGURED_DEFAULT_VOLUME from attribute store. Value set to 0.");
  }

  attribute_store_node_t tone_node
    = attribute_store_get_first_child_by_type(state_node,
                                              ATTRIBUTE_COMMAND_CLASS_SOUND_SWITCH_CONFIGURED_DEFAULT_TONE_IDENTIFIER);

  status = attribute_store_get_desired_else_reported(tone_node,
                             &configuration->tone,
                             sizeof(configuration->tone));

  if (status != SL_STATUS_OK) {
    configuration->tone = 0;
    sl_log_warning(LOG_TAG, "Can't get CONFIGURED_DEFAULT_TONE_IDENTIFIER from attribute store. Value set to 0.");
  }
}
}
attribute_store_get_first_child_by_type() function fetches the node
ID of given type. Once we have the correct node ID, we can fetch its
value with various attribute_store_get_xxx() functions. Here we use
attribute_store_get_desired_else_reported() because we want either
the desired or reported value of the attribute. If something goes wrong
the function returns an error code and we set default values.
Report callback
In the handler we defined previously we’ll need to add a control handler :
// ...
handler.control_handler = &zwave_command_class_sound_switch_control_handler;
// ...
The control handler is called when the controller receives a report command. You can then check which report was sent and update the values in attribute store.
sl_status_t zwave_command_class_sound_switch_control_handler(
  const zwave_controller_connection_info_t *connection_info,
  const uint8_t *frame_data,
  uint16_t frame_length)
{
  if (frame_length <= COMMAND_INDEX) {
    return SL_STATUS_NOT_SUPPORTED;
  }

  switch (frame_data[COMMAND_INDEX]) {
    case SOUND_SWITCH_CONFIGURATION_REPORT:
      return zwave_command_class_sound_switch_handle_configuration_report(
        connection_info,
        frame_data,
        frame_length);
    default:
      return SL_STATUS_NOT_SUPPORTED;
  }
}
The control handler function takes 3 arguments :
zwave_controller_connection_info_t *connection_info : Structure holding information about the source and destination when transmitting and receiving Z-Wave frames. You can retrieve the endpoint node ID in the attribute store with
zwave_command_class_get_endpoint_node(connection_info)uint8_t *frame_data : frame received
uint16_t frame_length : length of frame received
We can take a look at the function that process the report frame :
sl_status_t zwave_command_class_sound_switch_handle_configuration_report(
  const zwave_controller_connection_info_t *connection_info,
  const uint8_t *frame_data,
  uint16_t frame_length)
{

  if (frame_length < 4) {
    return SL_STATUS_FAIL;
  }

  attribute_store_node_t endpoint_node
    = zwave_command_class_get_endpoint_node(connection_info);

  sound_switch_volume_t volume = frame_data[2];
  if (volume > 100) {
    sl_log_warning(LOG_TAG, "Node reported volume higher than 100");
    volume = 100;
  }

  attribute_store_set_child_reported(
    endpoint_node,
    ATTRIBUTE_COMMAND_CLASS_SOUND_SWITCH_CONFIGURED_DEFAULT_VOLUME,
    &volume,
    sizeof(volume));

  sound_switch_tone_id_t tone = frame_data[3];

  attribute_store_set_child_reported(
    endpoint_node,
    ATTRIBUTE_COMMAND_CLASS_SOUND_SWITCH_CONFIGURED_DEFAULT_TONE_IDENTIFIER,
    &tone,
    sizeof(tone));

  return SL_STATUS_OK;
}
It’s good practice to check the frame length before processing. We
return SL_STATUS_FAIL if something goes wrong parsing the frame. The
command handler component uses these return codes to respond to
Supervision Get Commands. Returning SL_STATUS_FAIL sends a fail
status therefore be standard compatible. (More information on
Supervision Status code descriptions CC:006C.01.02.11.006 in the Z-Wave
standard).
zwave_command_class_get_endpoint_node allows us to convert a
zwave_controller_connection_info_t into a node ID and returns the
current endpoint node ID. We can use it to update all the attribute we
need.
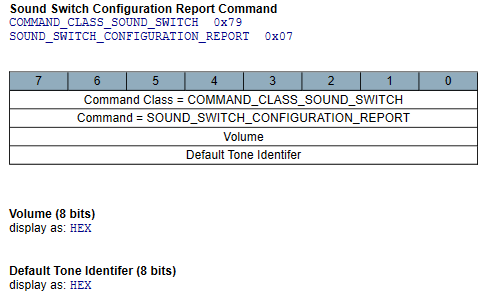
As we can see the report frame has a total size of 4 bits. We can access
the volume part with frame_data[2] and the default tone identifier
with frame_data[3]. We then mark those attributes as reported. Our
volume attribute is
ATTRIBUTE_COMMAND_CLASS_SOUND_SWITCH_CONFIGURED_DEFAULT_VOLUME so we
set this value as reported with the value of frame_data[2] with the
function attribute_store_set_child_reported.
attribute_store_set_child_reported allows you to update an attribute
located under a node ID. Here we have the endpoint node ID so we can set
the value of any attribute right underneath.
Now we can repeat this process for all the available commands (get/set/report) and set/get attribute based on your needs.
Testing our implementation
You can test if the request are correctly sent and received by manually
making changes in the attribute store. To do so, you’ll need access to
the ZPC CLI. Start the zpc executable directly (and stop the uic-service
if running). Once its running press enter to see the ZPC> command
line. It supports autocompletion and the help command.
You can search for the node ID with the various log functions. The most
useful one is attribute_store_log_search that allows you to search
(case sensitive) for an attribute description.
Once you’ve got the node ID you can use functions such as
attribute_store_set_desired nodeID,value or
attribute_store_undefine_reported nodeID to trigger some changes.
You can also send raw Z-Wave frames with the zwave_tx commands.
Mapping Z-Wave to Dotdot UCL with .uam file
You should have some basic knowledge about clusters and UAM files.
Now that our attribute store is correctly defined and sending the right Z-Wave commands it’s time to map it to the UCL model. This allows our attributes to be controlled by the MQTT broker (and by some extend the dev UI).
Map Z-Wave attribute to clusters attributes
The clusters are represented by XML files located in
components\uic_dotdot\dotdot-xml. Our Sound Switch command class
need at least the following features :
Play a tone
Configure volume
Configure tone ID
The play tone is basically a switch (0: stop playing, 255: playing). It
can be represented by the OnOff cluster.
The volume and tone ID are numerical values. It can be represented by
the Level cluster that can control numerical values.
We’ll start by the simplest one, the OnOff cluster. If we take a
look at the OnOff cluster we can see the attribute it defines :
On/Off cluster
<zcl:cluster
 xmlns:zcl="http://zigbee.org/zcl/clusters"
 xmlns:xsi="http://www.w3.org/2001/XMLSchema-instance"
 xmlns:type="http://zigbee.org/zcl/types"
 xmlns:xi="http://www.w3.org/2001/XInclude"
 xsi:schemaLocation="http://zigbee.org/zcl/clusters cluster.xsd http://zigbee.org/zcl/types type.xsd"
 id="0006" revision="2" name="OnOff">
<!-- ... -->
<server>
    <attributes>
      <attribute id="0000" name="OnOff" type="bool" max="1" required="true" reportRequired="true" sceneRequired="true" default="0" />
      <!-- ... -->
    </attributes>
    <!-- ... -->
  </server>
</zcl:cluster>
Here, we are interested in the OnOff attribute with id 0000.
It’s that ZCL attribute that is mapped to our
ATTRIBUTE_COMMAND_CLASS_SOUND_SWITCH_TONE_PLAY Z-Wave attribute. An
other important information is the cluster ID in the zcl:cluster
attributes (id="0006").
In applications/zpc/components/dotdot_mapper/rules we can create our
uam file. It must be named by the following naming convention :
{CLUSTER_NAME}_to_{COMMAND_CLASS_NAME}CC where {CLUSTER_NAME} is
the ZCL cluster name and {COMMAND_CLASS_NAME} is your Z-Wave command
class name (without spaces). We name our file
OnOff_to_SoundSwitchCC.uam.
The first thing we’ll do is to define where to find our Z-Wave
ATTRIBUTE_COMMAND_CLASS_SOUND_SWITCH_TONE_PLAY attribute. Remember
in the beginning when we defined some ID for our Z-Wave attributes ?
This is where we’ll use it. Our command class sound switch have the ID 0x79
and ATTRIBUTE_COMMAND_CLASS_SOUND_SWITCH_TONE_PLAY 0x08. We can
access to this attribute by doing :
def zwSOUND_SWITCH_TONE_PLAY 0x7908
It works the same way for the OnOff cluster attributes. We take the
cluster ID (0006) followed by the attribute ID (0000) :
def zbON_OFF 0x00060000
Note
The naming convention is to prefix Z-Wave attribute with
zw and ZCL attributes with zb.
We usually use the priority 25 for this kind of rules to have higher priority over generic switches.
We need to prevent chain_reaction because we map the Z-Wave to zcl
and vice versa.
Z-Wave to zcl : Used when attribute store is updated (e.g Z-Wave report command)
zcl to Z-Wave : Used when zcl model is updated (e.g with commands)
def zwave_no_sound_switch (e'zwSOUND_SWITCH_TONE_PLAY == 0)

scope 25 chain_reaction(0) {
  // Linking attributes zwave -> zigbee (note : 0 is stop playing)
  r'zbON_OFF =
    if (zwave_no_sound_switch) undefined
    if (r'zwSOUND_SWITCH_TONE_PLAY != 0) 1 0
  d'zbON_OFF =
    if (zwave_no_sound_switch) undefined
    if (d'zwSOUND_SWITCH_TONE_PLAY != 0) 1 0

  // Linking attributes zigbee -> zwave
  d'zwSOUND_SWITCH_TONE_PLAY =
    if (zwave_no_sound_switch) undefined
    if (d'zbON_OFF != 0) 255 0

  r'zwSOUND_SWITCH_TONE_PLAY =
    if (zwave_no_sound_switch) undefined
    if (r'zbON_OFF != 0) 255 0
}
This way we ensure that both attribute are linked no matter if it’s
changed in the ZCL world or Z-Wave world. chain_reaction(0) prevent
the mapper to go in a infinite loop.
UAM Guard
In our previous UAM example we have defined an function that checks if the Sound Switch Command Class is active for the current endpoint :
def zwave_no_sound_switch (e'zwSOUND_SWITCH_TONE_PLAY == 0)
Here we check the existence of zwSOUND_SWITCH_TONE_PLAY to see if
the endpoint is supporting Sound Switch.
We need to make sure that if we don’t have any sound switch active that :
zwSOUND_SWITCH_TONE_PLAYshould not exist and not be mapped to thezbON_OFFvaluezbON_OFFdoesn’t take the value ofzwSOUND_SWITCH_TONE_PLAY. This prevents conflict with other Z-Wave CC (like Binary Switch that also maps tozbON_OFF).
Make sure that your UAM file contains this guard to prevent interferences with other command classes implementation.
Level cluster
The OnOff cluster was very straight forward, but the Level
requires some arbitrary choices. We need to map 2 values :
The current volume
The current tone ID
Let’s look at the Level cluster definition :
<zcl:cluster
  xmlns:zcl="http://zigbee.org/zcl/clusters"
  xmlns:xsi="http://www.w3.org/2001/XMLSchema-instance"
  xmlns:type="http://zigbee.org/zcl/types"
  xmlns:xi="http://www.w3.org/2001/XInclude"
  xsi:schemaLocation="http://zigbee.org/zcl/clusters cluster.xsd http://zigbee.org/zcl/types type.xsd"
  id="0008" revision="2" name="Level">
  <classification role="application" picsCode="LVL" primaryTransaction="1" />
  <!-- ... -->
  <server>
    <attributes>
      <attribute id="0000" name="CurrentLevel" type="uint8" reportRequired="true" sceneRequired="true" default="255" required="true">
        <restriction>
          <type:minInclusiveRef ref="MinLevel" />
          <type:maxInclusiveRef ref="MaxLevel" />
        </restriction>
      </attribute>
      <!-- ... -->
      <attribute id="0002" name="MinLevel" type="uint8" default="0">
        <restriction>
          <type:maxInclusiveRef ref="MaxLevel" />
        </restriction>
      </attribute>
      <attribute id="0003" name="MaxLevel" type="uint8" max="255" default="255">
        <restriction>
          <type:minInclusiveRef ref="MinLevel" />
        </restriction>
      </attribute>

      <attribute id="0004" name="CurrentFrequency" type="uint16" reportRequired="true" sceneRequired="true" default="0">
        <restriction>
          <type:minInclusiveRef ref="MinFrequency" />
          <type:maxInclusiveRef ref="MaxFrequency" />
        </restriction>
      </attribute>
      <attribute id="0005" name="MinFrequency" type="uint16" default="0">
        <restriction>
          <type:maxInclusiveRef ref="MaxFrequency" />
        </restriction>
      </attribute>
      <attribute id="0006" name="MaxFrequency" type="uint16" max="65535" default="0">
        <restriction>
          <type:minInclusiveRef ref="MinFrequency" />
        </restriction>
      </attribute>
      <!-- ... -->
    </attributes>
    <!-- ... -->
  </server>
</zcl:cluster>
We see that we have access to 2 int attributes : CurrentLevel and
CurrentFrequency. We can decide to map the current volume to
CurrentLevel and current tone ID to CurrentFrequency (even if
its make little sense). We’ll see how to implement our own cluster if we
need more accuracy here.
Both ZCL attributes have a min and a max values, so we need to map those as well.
First we’ll create our file Level_to_SoundSwitchCC.uam in
applications/zpc/components/dotdot_mapper/rules.
Let’s define our Z-Wave attribute definitions :
def zwSOUND_SWITCH_CONFIGURED_VOLUME 0x7902
def zwSOUND_SWITCH_TONE_INFO_IDENTIFIER 0x7903
def zwSOUND_SWITCH_TONE_NUMBER 0x7904
We bind zwSOUND_SWITCH_TONE_NUMBER the to the MaxFrequency
attribute so that our CurrentFrequency doesn’t overflow. Since
CurrentFrequency here represent our tone ID it must be between 1 and
zwSOUND_SWITCH_TONE_NUMBER.
And our zcl level attributes :
def zbLEVEL_CLUSTER_LEVEL   0x00080000
def zbLEVEL_CLUSTER_MIN_LEVEL 0x00080002
def zbLEVEL_CLUSTER_MAX_LEVEL 0x00080003
def zbLEVEL_CLUSTER_FREQ 0x00080004
def zbLEVEL_CLUSTER_FREQ_MIN 0x00080005
def zbLEVEL_CLUSTER_FREQ_MAX 0x00080006
def zbLEVEL_CLUSTER_TRANSITION_TIME 0x00080010
The zbLEVEL_CLUSTER_TRANSITION_TIME is here to enable the Move
command. We define it to make sure we can move our value the way we want
to.
Note
To understand how we get the various ID see the OnOff cluster section
We need some constants for the min/max volume also since it is not defined on our command class :
def min_level 0
def max_level 100
First we’ll map une CurrentLevel and CurrentFrequency attributes with their counterpart :
def zwave_no_sound_switch (e'zwSOUND_SWITCH_TONE_PLAY == 0)

scope 25  chain_reaction(0) {
  // Map current level to configured volume
  // zwave -> ucl
  r'zbLEVEL_CLUSTER_LEVEL =
    if (zwave_no_sound_switch) undefined
    r'zwSOUND_SWITCH_CONFIGURED_VOLUME
  d'zbLEVEL_CLUSTER_LEVEL =
    if (zwave_no_sound_switch) undefined
    d'zwSOUND_SWITCH_CONFIGURED_VOLUME
  // ucl -> zwave
  d'zwSOUND_SWITCH_CONFIGURED_VOLUME =
    if (zwave_no_sound_switch) undefined
    d'zbLEVEL_CLUSTER_LEVEL
  r'zwSOUND_SWITCH_CONFIGURED_VOLUME =
    if (zwave_no_sound_switch) undefined
    r'zbLEVEL_CLUSTER_LEVEL

  // Map frequency to current tone identifier
  // zwave -> ucl
  r'zbLEVEL_CLUSTER_FREQ =
    if (zwave_no_sound_switch) undefined
    r'zwSOUND_SWITCH_TONE_INFO_IDENTIFIER
  d'zbLEVEL_CLUSTER_FREQ =
    if (zwave_no_sound_switch) undefined
    d'zwSOUND_SWITCH_TONE_INFO_IDENTIFIER
  // ucl -> zwave
  d'zwSOUND_SWITCH_TONE_INFO_IDENTIFIER =
    if (zwave_no_sound_switch) undefined
    d'zbLEVEL_CLUSTER_FREQ
  r'zwSOUND_SWITCH_TONE_INFO_IDENTIFIER =
    if (zwave_no_sound_switch) undefined
    r'zbLEVEL_CLUSTER_FREQ
}
Note
This process is explained in OnOff cluster
section and the zwave_no_sound_switch in
UAM Guard section
To bind the min and max values we add those rules :
// Min and max volume
r'zbLEVEL_CLUSTER_MIN_LEVEL =
  if (zwave_no_sound_switch) undefined
  if (e'zwSOUND_SWITCH_CONFIGURED_VOLUME) min_level undefined
r'zbLEVEL_CLUSTER_MAX_LEVEL =
  if (zwave_no_sound_switch) undefined
  if (e'zwSOUND_SWITCH_CONFIGURED_VOLUME) max_level undefined
We can’t bind value to raw constants so we need to add an condition to
it. We choose to define it only if zwSOUND_SWITCH_CONFIGURED_VOLUME
exists since if it doesn’t the min/max value doesn’t make sense.
Same applies for MinFrequency and MaxFrequency but instead of
constants we use our zwSOUND_SWITCH_TONE_NUMBER attribute :
r'zbLEVEL_CLUSTER_FREQ_MIN =
   if (zwave_no_sound_switch) undefined
   if (e'zwSOUND_SWITCH_TONE_NUMBER) 1 undefined
 r'zbLEVEL_CLUSTER_FREQ_MAX =
   if (zwave_no_sound_switch) undefined
   if (e'zwSOUND_SWITCH_TONE_NUMBER) r'zwSOUND_SWITCH_TONE_NUMBER undefined
The last attribute we need to define is
zbLEVEL_CLUSTER_TRANSITION_TIME to make Level commands work. All
we need to do is set a value. In our case we choose 0 because we don’t
want a transition time when updating our levels.
// Required to enable move command
d'zbLEVEL_CLUSTER_TRANSITION_TIME =
  if (zwave_no_sound_switch) undefined
  if (e'zwSOUND_SWITCH_TONE_NUMBER) 0 undefined
r'zbLEVEL_CLUSTER_TRANSITION_TIME =
  if (zwave_no_sound_switch) undefined
  if (e'zwSOUND_SWITCH_TONE_NUMBER) 0 undefined
Now with those files we should be able to control our device from the MQTT broker and the dev UI since it monitors the ZCL attributes.
Quirks
Sometimes, devices are not acting like they should. The Aeotec Doorbell 6 for example define 9 different endpoints. Each endpoint can have its own configuration (tone ID, volume) and can play a tune. However, the first endpoint is behaving differently from the others.
It acts as a default endpoint that copy the configuration of the second one (ep1). That means if you send a play command to the first endpoint, the second one is also marked as “is playing” and both use the same configuration (tone ID, volume).
When we tell the first endpoint (ep0) to play, the second one (ep1) is also marked as “is playing”, but when the tone finishes only the ep1 receive a report telling the sound is over leading the ep0 in a incorrect state (marked as playing but in reality it’s not).
To address this issue we can use something we call Quirks in UAM. They
allow us to execute rules on a specific device. The naming convention is
Quirks_{device_name}.uam where {device_name} is your device
name. In our case we can create Quirks_aeotec_doorbell.uam.
A device can be identified with 3 parameters : manufacturer ID, product type and product ID. We can have access to it in UAM with the following ID :
// Special maps to help controlling the Aeotec doorbell
def zwMANUFACTURER_ID           0x00007202
def zwPRODUCT_TYPE              0x00007203
def zwPRODUCT_ID                0x00007204
We the need a reference to the SOUND_SWITCH_TONE_PLAY attribute :
def zwSOUND_SWITCH_TONE_PLAY 0x7908
We also need to have access to the endpoint list :
def ep 4
This allow us to reference each endpoint by doing ep[0] where 0
is the endpoint ID. This notation will be explained soon.
The last definition we need is a condition that returns true if we are
controlling our specific device. We use the manufacturer ID, product
type and product ID to identify our device. You can find those either in
the attribute tree (ZPC> attribute_store_log_search Manufacturer and
ZPC> attribute_store_log_search Product) or directly in the vendor
manual.
def aeotec_doorbell ((r'ep[0].zwMANUFACTURER_ID == 881) & (r'ep[0].zwPRODUCT_TYPE == 3) & (r'ep[0].zwPRODUCT_ID == 162))
Note
We have to write the endpoint (ep[0]) before acceding the
device identifiers or it will not work. This is explained bellow.
The Quirk need to run as a high priority rule since they are device
specific. Most of the Quirks runs as a priority of 500 or higher. Also
in our case we need to have access to the endpoint list. Defining ep
is not all we need to do : we also need common_parent_type(3) to our
rules :
scope 500 common_parent_type(3) {
}
The common_parent_type(3) changes the current scope configuration
for this mapping. This allows us to have access to each endpoint
(def ep 4). The numbers (3 and 4) are references to the
attributes’ ID. In
applications\zpc\components\zpc_attribute_store\include\attribute_store_defined_attribute_types.h
we can find :
///< This represents a Node ID. zwave_node_id_t type.
DEFINE_ATTRIBUTE(ATTRIBUTE_NODE_ID, 0x0003)
///< This represents an endpoint. zwave_endpoint_id_t type.
DEFINE_ATTRIBUTE(ATTRIBUTE_ENDPOINT_ID, 0x0004)
If we look at our current attribute store we may see something like that :
(1) Root node .................................................................     <> (<>)
    │───(2) HomeID ............................................................ [58,27,e5,fc] (<>)
    │   │───(3) NodeID ........................................................      1 (<>)
    │   │   │───(4) Endpoint ID ...............................................      0 (<>)
    │   │───(8) NodeID ........................................................      3 (<>)
    │   │   │───(9) Endpoint ID ...............................................      0 (<>)
    │   │   │───(153) Endpoint ID .............................................      1 (<>)
    │   │   │───(157) Endpoint ID .............................................      2 (<>)
    │   │   │───(161) Endpoint ID .............................................      3 (<>)
    │   │   │───(165) Endpoint ID .............................................      4 (<>)
    │   │   │───(169) Endpoint ID .............................................      5 (<>)
    │   │   │───(173) Endpoint ID .............................................      6 (<>)
    │   │   │───(177) Endpoint ID .............................................      7 (<>)
    │   │   │───(181) Endpoint ID .............................................      8 (<>)
If we position ourselves relative to our Node ID we can access each endpoint individually.
ATTRIBUTE_NODE_ID is defined at 0x0003 and
ATTRIBUTE_ENDPOINT_ID at 0x0004. That’s why we defined ep to
4 earlier. Now we tell that for this mapping our parent is the
ATTRIBUTE_NODE_ID with common_parent_type(3). This way ep[0]
reference the tree under the first endpoint, ep[1] the tree under
the second endpoint, etc.
This is why we needed to add ep[0] before zwMANUFACTURER_ID and
the other attributes in def aeotec_doorbell. Since its evaluated in
the ATTRIBUTE_NODE_ID context the only attribute directly available
is the ATTRIBUTE_ENDPOINT_ID. You can find more information about
this in How to write UAM files
So we need to map the second endpoint (ep[1]) tone play value to
match the first one (ep[0]) but ONLY when the device is the Aoetec
doorbell :
scope 500 common_parent_type(3) {
  r'ep[0].zwSOUND_SWITCH_TONE_PLAY = if aeotec_doorbell r'ep[1].zwSOUND_SWITCH_TONE_PLAY undefined
}
If aeotec_doorbell report false we set the reported value to
undefined to let other rules take care of it. Otherwise we map the
value to the value reported by the second endpoint.
Unit Testing
An approach that can be used to implement the test class is to try and think based on the command class specification and the code of the command class the good and bad scenarios that could happen. A suggestion is to try and create a method for each bad scenario, based on the implementation of the command class could be necessary in some occasions to create some nodes to test if any change happens to others.
The test files are located under
applications/zpc/components/zwave_command_classes/test. The naming
convention is zwave_command_class_{COMMAND_CLASS}_test.c so in our
case the file is named zwave_command_class_sound_switch_test.c.
Test are enabled by default in CMake. The CMake variable
BUILD_TESTING is controlling the test suite. Make sure it is set to
ON (either via the pseudo-gui ccmake or by passing the
-DBUILD_TESTING=ON to cmake directly).
Once the compilation is done, you can run all the tests with ctest
in your build directory. You can also run a specific test with the
command : ctest -R name_of_your_test. The name of your test is
defined with the NAME argument of the CMakeLists.txt in the test
folder (see next section for details).
If you need for details about your test result, pass the --verbose
option.
Note
Try to use the MESSAGE variant as much as possible in your tests
(e.g. TEST_ASSERT_EQUAL_MESSAGE) to provide a meaningful message
when a test fails.
This will help debugging the test and understand what went wrong.
Add test file to CMake
After creating the file we need to add it to the CMake build system. To
do so open the CMakeLists.txt located in the test folder and add :
# Sound switch unit test
target_add_unittest(zwave_command_classes

NAME zwave_command_class_sound_switch_test
SOURCES zwave_command_class_sound_switch_test.c

DEPENDS
  zpc_attribute_store_test_helper
  zwave_controller
  zwave_command_handler_mock
  uic_attribute_resolver_mock
  zpc_attribute_resolver_mock
  uic_dotdot_mqtt_mock
)
NAME: Same name as the SOURCE argument but without the extension (used if you want to run this specific test withctest -R name_of_your_test)SOURCES: Our test file name with the extensionDEPENDS: Dependencies of our test. You may add some based on your needs. More is available you can look at other test definitions to see them.
Base test skeleton
Once it is added to our build system, we define the test skeleton like this :
#include "zwave_command_class_sound_switch.h"
#include "zwave_command_classes_utils.h"
#include "unity.h"

// Generic includes
#include <string.h>

// Includes from other components
#include "datastore.h"
#include "attribute_store.h"
#include "attribute_store_helper.h"
#include "attribute_store_fixt.h"
#include "zpc_attribute_store_type_registration.h"

// Interface includes
#include "attribute_store_defined_attribute_types.h"
#include "ZW_classcmd.h"
#include "zwave_utils.h"
#include "zwave_controller_types.h"

// Test helpers
#include "zpc_attribute_store_test_helper.h"

// Mock includes
#include "attribute_resolver_mock.h"
#include "zpc_attribute_resolver_mock.h"
#include "zwave_command_handler_mock.h"
#include "dotdot_mqtt_mock.h"
#include "dotdot_mqtt_generated_commands_mock.h"

/// Setup the test suite (called once before all test_xxx functions are called)
void suiteSetUp()
{
  datastore_init(":memory:");
  attribute_store_init();
  zpc_attribute_store_register_known_attribute_types();
}

/// Teardown the test suite (called once after all test_xxx functions are called)
int suiteTearDown(int num_failures)
{
  attribute_store_teardown();
  datastore_teardown();
  return num_failures;
}

/// Called before each and every test
void setUp()
{
  zpc_attribute_store_test_helper_create_network();
}

/// Called after each and every test
void tearDown() {}
You can find the different function that is called before/after each test/test suite.
We’ll add to the setUp() function the entrypoint of our class :
/// Called before each and every test
void setUp()
{
  zpc_attribute_store_test_helper_create_network();

  // Call init
  TEST_ASSERT_EQUAL(SL_STATUS_OK, zwave_command_class_sound_switch_init());
}
Unless your specified your attribute creation in this function, your attribute tree is NOT available for the test cases. If your attribute creation is bound to the version update, you can set this attribute in the setUp() phase if really needed :
attribute_store_node_t version_node
    = attribute_store_add_node(ATTRIBUTE_COMMAND_CLASS_SOUND_SWITCH_VERSION,
    endpoint_id_node);

  zwave_cc_version_t version = 1;
  attribute_store_set_reported(version_node, &version, sizeof(version));
Test report Z-Wave function
We’ll add an handler stub that contains our sound switch handler definition (version, security, control handler,…). The handler stub function looks like this :
// Private variables
static zwave_command_handler_t handler = {};

// Stub for registering command classes
static sl_status_t zwave_command_handler_register_handler_stub(
  zwave_command_handler_t new_command_class_handler, int cmock_num_calls)
{
  handler = new_command_class_handler;

  TEST_ASSERT_EQUAL(ZWAVE_CONTROLLER_ENCAPSULATION_NONE,
                    handler.minimal_scheme);
  TEST_ASSERT_EQUAL(COMMAND_CLASS_SOUND_SWITCH, handler.command_class);
  TEST_ASSERT_EQUAL_MESSAGE(1, handler.version, "Mismatch of supported version");
  TEST_ASSERT_NOT_NULL(handler.control_handler);
  TEST_ASSERT_NULL(handler.support_handler);
  TEST_ASSERT_FALSE(handler.manual_security_validation);

  return SL_STATUS_OK;
We save our handler into a global static variable so we can use it later
in our test functions. All our test functions must start with the
test_ prefix. If we want to test our configuration report in the
best case scenario, we can call this function
test_sound_switch_configuration_report_happy_case(). Or if we want
to test the volume doesn’t go above 100, we can name it
test_sound_switch_configuration_report_volume_over_100().
Then, we add the stub definition in our setUp() function :
/// Called before each and every test
void setUp()
{
  //...

  // Unset previous definition of handler
  memset(&handler, 0, sizeof(zwave_command_handler_t));

  // Handler registration
  zwave_command_handler_register_handler_Stub(
    &zwave_command_handler_register_handler_stub);

  //...
}
It’s good practice to init the handler to its default value before each test. Now we can write a simple test for the configuration report :
void test_sound_switch_configuration_report_volume_over_100()
{
  zwave_controller_connection_info_t info = {};
  info.remote.node_id                     = node_id;
  info.remote.endpoint_id                 = endpoint_id;
  info.local.is_multicast                 = false;

  TEST_ASSERT_NOT_NULL_MESSAGE(handler.control_handler,
                              "Control handler should have been registered");
  TEST_ASSERT_EQUAL_MESSAGE(SL_STATUS_FAIL,
                    handler.control_handler(&info, NULL, 0),
                    "Report should have not worked on a empty frame");

  const uint8_t frame[] = {COMMAND_CLASS_SOUND_SWITCH,
                           SOUND_SWITCH_CONFIGURATION_REPORT,
                           101,
                           0x55};

  TEST_ASSERT_EQUAL_MESSAGE(SL_STATUS_OK,
                    handler.control_handler(&info, frame, sizeof(frame)),
                    "Report should have worked with a valid frame");

  attribute_store_node_t volume_node = attribute_store_get_node_child_by_type(
    endpoint_id_node,
    ATTRIBUTE_COMMAND_CLASS_SOUND_SWITCH_CONFIGURED_DEFAULT_VOLUME,
    0);
  TEST_ASSERT_EQUAL_MESSAGE(100, attribute_store_get_reported_number(volume_node),
                            "Volume should not go above 100");

  attribute_store_node_t tone_node = attribute_store_get_node_child_by_type(
    endpoint_id_node,
    ATTRIBUTE_COMMAND_CLASS_SOUND_SWITCH_CONFIGURED_DEFAULT_TONE_IDENTIFIER,
    0);
  TEST_ASSERT_EQUAL_MESSAGE(0x55, attribute_store_get_reported_number(tone_node),
                            "Tone value mismatch");
}
We can send to our control handler a Z-Wave report frame of
configuration with handler.control_handler() and checks if the
attributes are correctly updated in the attribute store. This test
ensure that the sound level never goes over 100 even if reported so.
Test get/set Z-Wave function
We’ll had an handler stub that contains our sound switch get and set
callbacks. We defined our get and set function for
ATTRIBUTE_COMMAND_CLASS_SOUND_SWITCH_CONFIGURED_DEFAULT_VOLUME and
ATTRIBUTE_COMMAND_CLASS_SOUND_SWITCH_TONES_NUMBER like this :
attribute_resolver_register_rule(
 ATTRIBUTE_COMMAND_CLASS_SOUND_SWITCH_CONFIGURED_DEFAULT_VOLUME,
 &zwave_command_class_sound_switch_configuration_set,
 &zwave_command_class_sound_switch_configuration_get);

attribute_resolver_register_rule(
 ATTRIBUTE_COMMAND_CLASS_SOUND_SWITCH_TONES_NUMBER,
 NULL,
 &zwave_command_class_sound_switch_tones_number_get);
So we can access them like this in our test file :
static attribute_resolver_function_t configuration_get  = NULL;
static attribute_resolver_function_t configuration_set  = NULL;
static attribute_resolver_function_t tone_number_get  = NULL;

// Buffer for frame
static uint8_t received_frame[255]  = {};
static uint16_t received_frame_size = 0;

// Stub functions
static sl_status_t
  attribute_resolver_register_rule_stub(attribute_store_type_t node_type,
                                        attribute_resolver_function_t set_func,
                                        attribute_resolver_function_t get_func,
                                        int cmock_num_calls)
{
  if (node_type == ATTRIBUTE_COMMAND_CLASS_SOUND_SWITCH_CONFIGURED_DEFAULT_VOLUME) {
    TEST_ASSERT_NOT_NULL(set_func);
    TEST_ASSERT_NOT_NULL(get_func);
    configuration_get = get_func;
    configuration_set = set_func;
  } else if (node_type == ATTRIBUTE_COMMAND_CLASS_SOUND_SWITCH_TONES_NUMBER) {
    TEST_ASSERT_NULL(set_func);
    TEST_ASSERT_NOT_NULL(get_func);
    tone_number_get = get_func;
  }

  return SL_STATUS_OK;
}
Note that we might don’t have a set and get function for all attributes.
We can check the null value of set_func or get_func with
TEST_ASSERT_NULL. This way we ensure that our set/get callbacks are
correctly defined.
We also define a received_frame buffer that allows us to test
get/set functions.
Then we add the stub definition in our setUp() function :
/// Called before each and every test
void setUp()
{
  //...

  // Unset previous definition get/set functions
  configuration_get  = NULL;
  configuration_set  = NULL;
  tone_number_get  = NULL;
  memset(received_frame, 0, sizeof(received_frame));
  received_frame_size = 0;
  // Resolution functions
  attribute_resolver_register_rule_Stub(&attribute_resolver_register_rule_stub);

  //...
}
It’s good practice to init the functions and frame buffer to its default value before each test.
Z-Wave Get test
Now we can write a simple test for the configuration get :
void test_sound_switch_configuration_get_happy_case()
{
  // Ask for a Get Command, should always be the same
  TEST_ASSERT_NOT_NULL(configuration_get);
  configuration_get(0, received_frame, &received_frame_size);
  const uint8_t expected_frame[]
    = {COMMAND_CLASS_SOUND_SWITCH, SOUND_SWITCH_CONFIGURATION_GET};
  TEST_ASSERT_EQUAL(sizeof(expected_frame), received_frame_size);
  TEST_ASSERT_EQUAL_UINT8_ARRAY(expected_frame,
                                received_frame,
                                received_frame_size);
}
Nothing special here we should have the Sound Switch command class ID and the configuration get ID. The next section shows you how to interact with the attribute store. It could be useful if your get function have an argument.
Z-Wave Set test
Let’s now test the set function :
void test_sound_switch_configuration_set_happy_case()
{
  uint8_t volume = 15;
  uint8_t tone = 30;

  // Attribute tree is empty as this point so we add it here
  attribute_store_node_t volume_node
    = attribute_store_add_node(ATTRIBUTE_COMMAND_CLASS_SOUND_SWITCH_CONFIGURED_DEFAULT_VOLUME, endpoint_id_node);
  attribute_store_node_t tone_node
    = attribute_store_add_node(ATTRIBUTE_COMMAND_CLASS_SOUND_SWITCH_CONFIGURED_DEFAULT_TONE_IDENTIFIER, endpoint_id_node);

  attribute_store_set_desired(volume_node, &volume, sizeof(volume));
  attribute_store_set_desired(tone_node, &tone, sizeof(tone));

  TEST_ASSERT_NOT_NULL(configuration_set);
  // We can either set the volume_node or tone_here here.
  configuration_set(volume_node, received_frame, &received_frame_size);

  const uint8_t expected_frame[]
    = {COMMAND_CLASS_SOUND_SWITCH, SOUND_SWITCH_CONFIGURATION_SET, volume, tone};
  TEST_ASSERT_EQUAL(sizeof(expected_frame), received_frame_size);
  TEST_ASSERT_EQUAL_UINT8_ARRAY(expected_frame,
                                received_frame,
                                received_frame_size);
}
We need to manually set the node value since the attribute tree should be empty.
We set the desired values in our attribute store (endpoint_id_node
is automatically set by test helper function) and call the set function.
This way, we can see if the set function is correctly getting the
attributes from the attribute store.
This should cover the basic of unit testing your Z-Wave command class. Don’t forget to also test edge cases and not just the happy cases. compliance
Z-Wave Self-Certification with the Compliance Test Tool (CTT)
The Z-Wave Compliance Test Tool (CTT) is provided by the Z-Wave Alliance. The CTT is designed to ensure that developers have a tool to assist in performing the self-certification tests required for the Z-Wave certification. Note that the use of the CTT does not guarantee certification, but it is a good starting point to know if your command class implementation is robust.
Prerequisites
To test the ZPC controller you’ll need 3 Z-Wave boards:
Two flashed with the
Z-Wave - NCP Serial API ControllerdemoOne for CTT
One for ZPC
One flashed with the
Z-Wave - NCP Serial API End DevicedemoOne for CTT
Warning
Make sure you select the demo with the right region.
You need to create an account in https://certification.z-wavealliance.org to have access to the CTT tool. Once you are in, download the latest version of CTT.
Setup the CTT project
Launch CTT and create a new project. Select the
Project based on data from Z-Wave Device option :
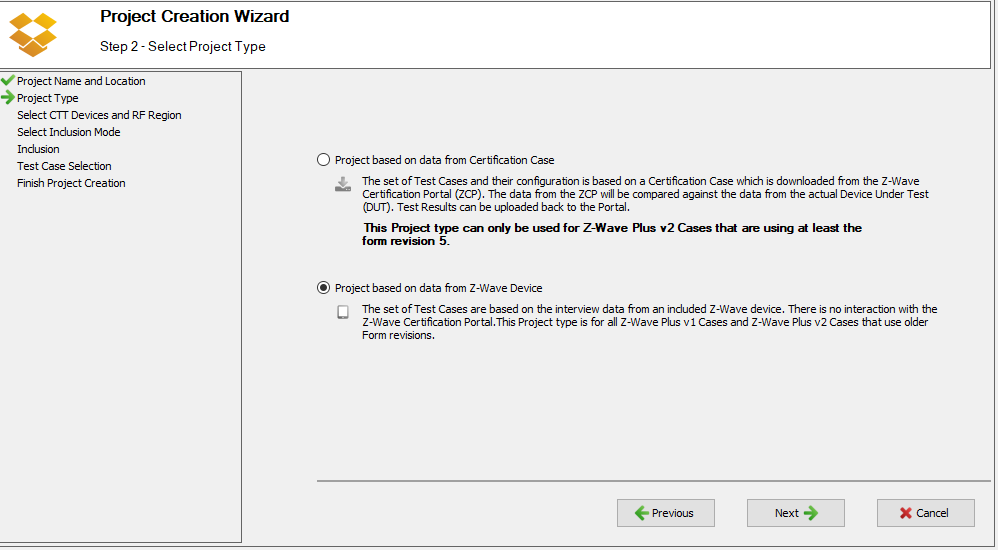
This allows you to not create a whole Certification Case for your product and run specific tests.
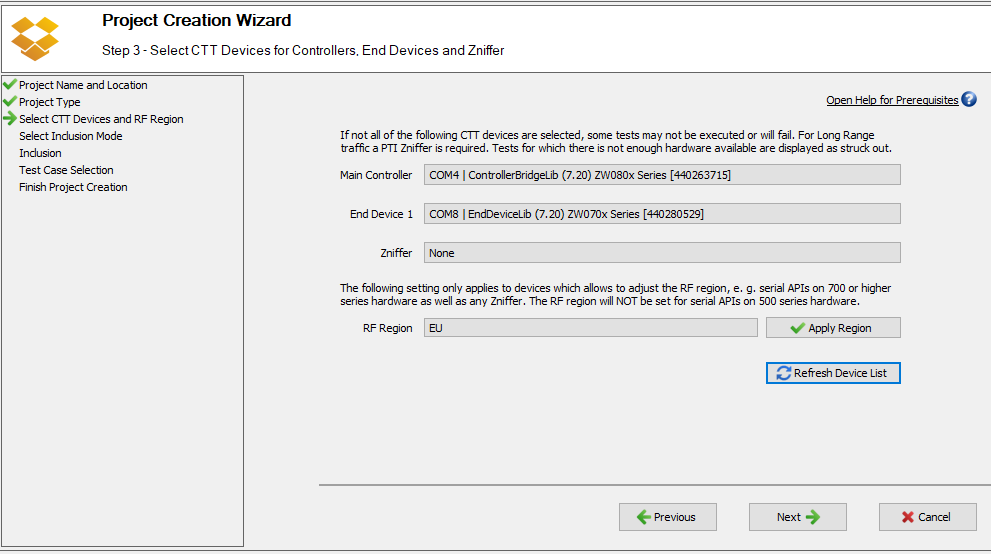
Next, select the devices used in CTT. When refreshing the device list you should at least have 2 controllers and 1 end device available :
Examining available devices...

 * COM3
 * COM4            - ControllerBridgeLib (Z-Wave 7.20) ZW080x Series detected.
 * COM5            - ControllerBridgeLib (Z-Wave 7.20) ZW070x Series detected.
 * COM8            - EndDeviceLib (Z-Wave 7.20) ZW070x Series detected.

   - 3 devices found -
The Refresh Device List button should fill the fields automatically
:
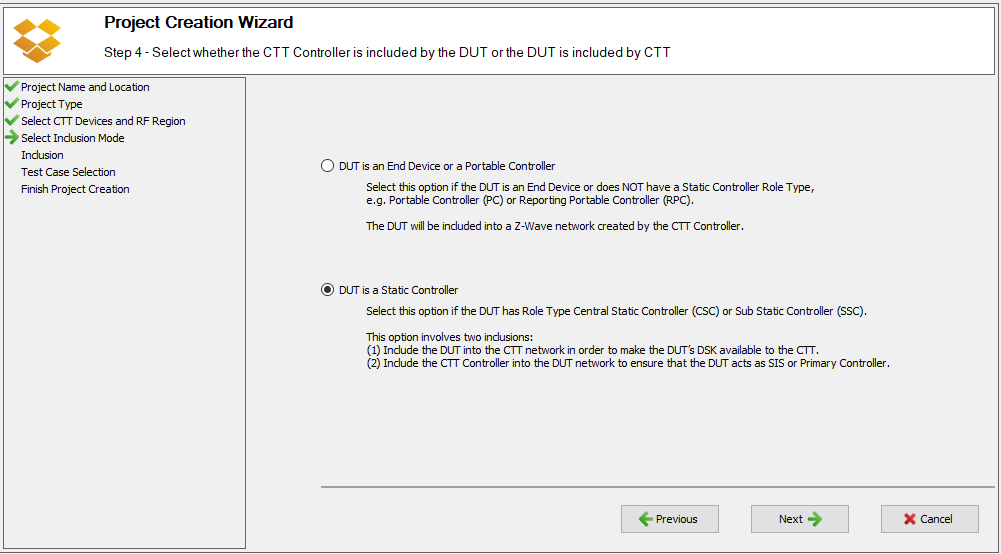
Next, you have to specify the type of DUT (Device Under Test). Since we
want to test a controller we have to select
DUT is a Static Controller :
Next, you should have ZPC running to include the CTT devices.
Note
If you use WSL `usbipd<https://learn.microsoft.com/en-us/windows/wsl/connect-usb>`__ can help you connect your Z-Wave controller to ZPC.
You can skip Step 5 - CTT includes DUT and move to the next step DUR includes CTT.
In Step 6 DUT includes CTT, start by pressing Reset for the
Reset CTT Controller step.
Then, you’ll have reset ZPC and start add mode. You can do that either in the Dev GUI or in CLI.
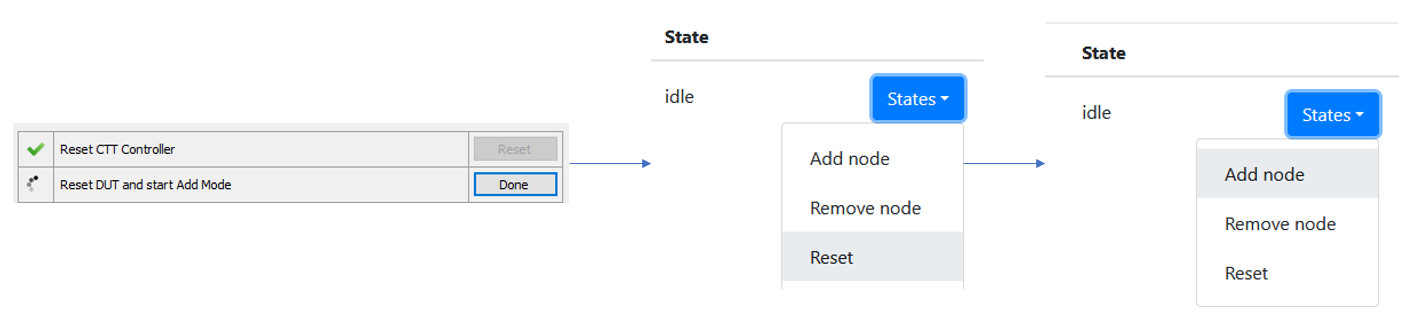
In CLI :
ZPC> zwave_set_default
2023-Nov-29 11:49:23.791945 <i> [zwave_command_association] Reset step: Associations clean-up
...

ZPC> zwave_add_node
2023-Nov-29 11:50:13.360236 <i> [zwave_network_managment] Initiating a Z-Wave Network Inclusion
Then, you’ll have to set the DSK to include the CTT controller :
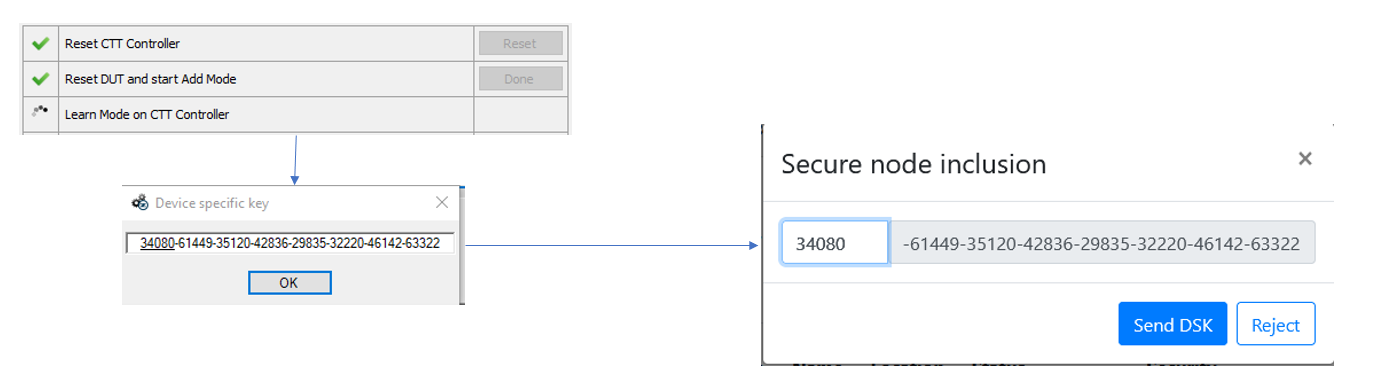
In CLI:
ZPC>zwave_accept_dsk 34080
2023-Nov-29 11:54:38.492938 <W> [process.c] Process zwave_network_management_process took 59 ms to execute event 16.
2023-Nov-29 11:54:38.493143 <i> [zwave_controller_dispatch] New NodeID 2 has joined the network. Granted keys: 0x00 - Protocol: 0
2023-Nov-29 11:54:38.493211 <i> [zwave_controller_dispatch] DSK: 34080-61449-35120-42836-29835-32220-46142-63322
Once it’s included, you can click on the Done button of
Inclusion done; wait for DUT interviewing CTT step.
The setup is now complete and you should see 2 controllers in the Dev Gui :

To finish the project creation you have to answer some questions about the DUT:
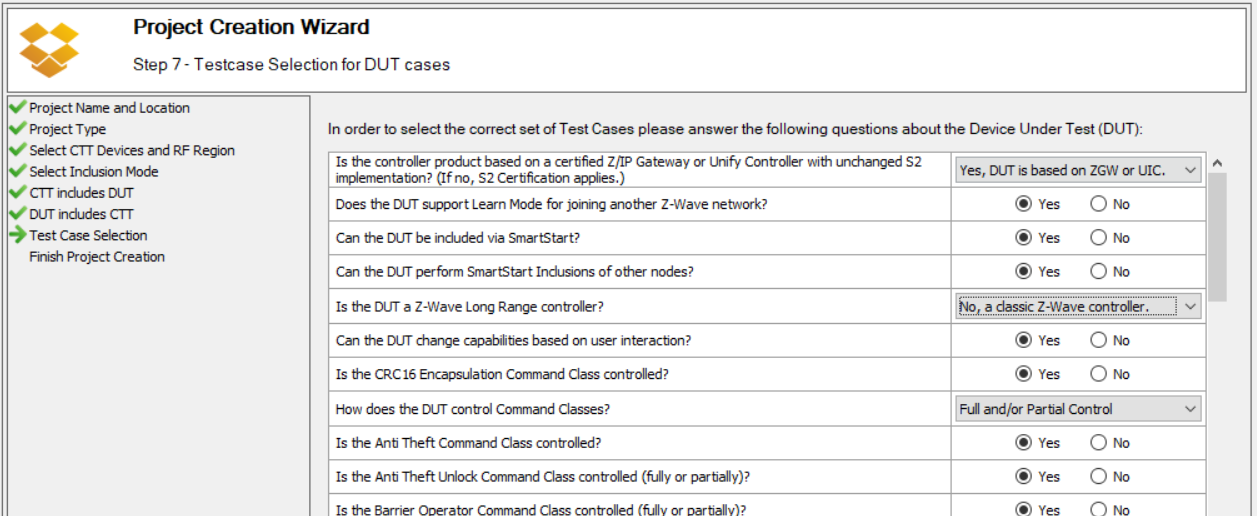
Select option according to the screenshot above. You can select either the command class you want to test or say yes to all even if they are not supported.
Run the tests
The commands class tests can be found under the Interactive Tests section:
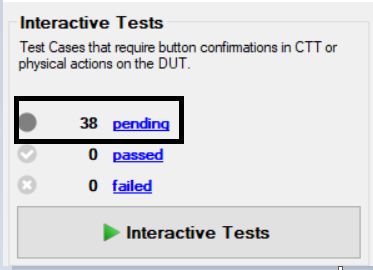
Click on the pending link to have access to the complete list of command class tests :
Note
Only the supported command class you registered as controlled in Step 7 of project creation will show up.
The ZPC prints its supported command class at startup :
$> zpc
| Command Class                  | Version | Support | Control | Security Level              | Comment |
| ------------------------------ | ------- | ------- | ------- | --------------------------- | ------- |
| Alarm Sensor                   |       1 |         |       x | N/A                         |         |
| Association                    |       2 |       x |       x | Network Scheme              |         |
| Association Group Info (AGI)   |       3 |       x |       x | Network Scheme              |         |
| Barrier Operator               |       1 |         |       x | N/A                         |         |
| Basic                          |       2 |         |       x | N/A                         |         |
| Battery                        |       3 |         |       x | N/A                         | Control Part is auto-generated. |
| Binary Sensor                  |       1 |         |       x | N/A                         | Control Part is auto-generated. |
| Binary Switch                  |       2 |         |       x | N/A                         |         |
| Central Scene                  |       3 |         |       x | N/A                         | Partial control: key attributes are not displayed in the UI. |
| Color Switch                   |       3 |         |       x | N/A                         | Partial Control:<br>1. Durations are ignored<br>2. No support for Start/Stop Level Change<br>3. No support for other Color Component IDs than 0,1,2,3,4 |
| Configuration                  |       4 |         |       x | N/A                         |         |
| Device Reset Locally           |       1 |       x |       x | Network Scheme              |         |
| Door Lock                      |       4 |         |       x | N/A                         |         |
| Firmware Update                |       7 |       x |       x | Network Scheme              |         |
| Inclusion Controller           |       1 |       x |       x | Unencrypted                 |         |
| Indicator                      |       3 |       x |       x | Network Scheme              |         |
| Manufacturer Specific          |       2 |       x |       x | Network Scheme              |         |
| Meter                          |       6 |         |       x | N/A                         | Partial control: <br>1. Meter Reset Command is not supported due to missing dotdot ZCL equivalent functionality. |
| Multi Channel                  |       4 |         |       x | N/A                         |         |
| Multi Channel Association      |       3 |       x |       x | Network Scheme              |         |
| Multi Command                  |       1 |       x |         | Unencrypted                 |         |
| Multilevel Sensor              |      11 |         |       x | N/A                         | Partial control: <br>1. Not all scales are supported<br>2. Not all types are shown in the UI. |
| Multilevel Switch              |       4 |         |       x | N/A                         |         |
| Notification                   |       8 |         |       x | N/A                         | Partial Control: <br>1. No Push/Pull discovery is done.<br>2. No Pull sensor support. <br>3. Unknown types are not supported. <br>4. No Regular probing is done.  |
| Powerlevel                     |       1 |       x |         | Network Scheme              |         |
| Scene Activation               |       1 |         |       x | N/A                         |         |
| Scene Actuator Configuration   |       1 |         |       x | N/A                         | No interview performed automatically. |
| Scene Controller Configuration |       1 |         |       x | N/A                         |         |
| Security 0                     |       1 |       x |       x | Unencrypted                 |         |
| Security 2                     |       1 |       x |       x | Unencrypted                 |         |
| Sound Switch                   |       1 |         |       x | N/A                         |         |
| Supervision                    |       2 |       x |       x | Unencrypted                 |         |
| Thermostat Mode                |       3 |         |       x | N/A                         | Partial Control: Not all modes can be set |
| Thermostat Setpoint            |       3 |         |       x | N/A                         | Partial Control: <br>1. No discovery of ambiguous types in v1-v2 <br>2. Only a few setpoints can be configured. <br>3. Precision/size fields in the set are determined <br>automatically by the controller.  |
| Time                           |       1 |       x |         | Unencrypted                 |         |
| Transport Service              |       2 |       x |       x | Unencrypted                 |         |
| User Code                      |       2 |         |       x | N/A                         | Partial Control |
| Version                        |       3 |       x |       x | Network Scheme              |         |
| Wake Up                        |       3 |         |       x | N/A                         |         |
| Z-Wave Plus Info               |       2 |       x |       x | Unencrypted                 |         |
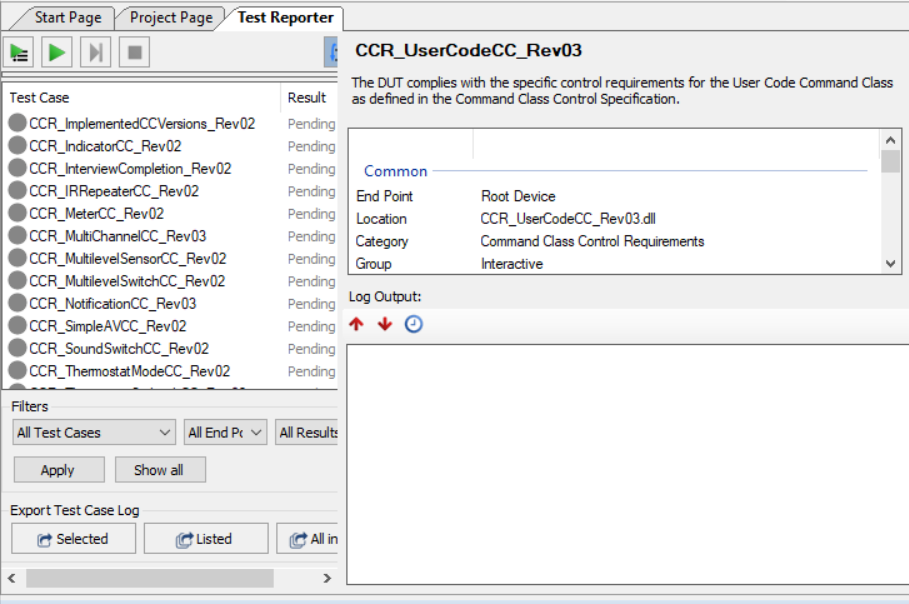
You can start a test by right clicking on it and press Run. The test
will ask you some questions about your implementation and to send
specific Z-Wave command. Those can be triggered through MQTT or via the
Dev GUI.
A set of python scripts are available for you to easily send commands to
CTT in applications/zpc/scripts/certification.