ZigPC Developer Guide
This readme is intended for Unify Framework developers, who are trying to cross compile, install, and run ZigPC on a Raspberry Pi.
Build Instructions
This guide describes how to cross compile the Zigbee Protocol Controller / ZigPC for Raspberry Pi using Docker on your work station. If you haven’t already built the Unify docker image, follow the guide in the docker folder readme.md file.
Set up Gecko SDK
The Zigbee Protocol Controller uses certain functionality in the GeckoSDK. The Gecko SDK can be downloaded through Simplicity Studio. The ZigPC uses the EmberZNet library provided through the Gecko Platform. See the [AN0822: Simplicity Studio User’s Guide] (https://www.silabs.com/documents/public/application-notes/AN0822-simplicity-studio-user-guide.pdf) for more information. In summary, select the EmberZNet library at installation time or, when creating a new project, select “Manage SDKs” followed by “Customize Installation”.
After EmberZNet/GeckoSDK is installed, locate its path (e.g., ~/SimplicityStudio/SDKs/gecko_sdk/). Currently, v4.0 is supported. Set the environment variable $GSDK_LOCATION to this path.
Modifying Underlying SLC-based Zigbee Host Library
The Zigbee Protocol Controller imports a Silicon Labs Configurator based UC project as a static library. This project should be configured in combination with any ZCL support changes performed.
See the Zigbee Host Library Readme for more details.
Cross Compiling for Raspberry Pi Using Docker
Cross compilation builds currently supports only the Raspberry Pi OS Bookworm.
From the root of the Unify source directory, run the following:
Build the Docker container image:
cd docker
./build_docker.sh arm64 uic_arm64
cd ..
Run the container with the GSDK locations mounted:
docker run -it --rm \
  --env GSDK_LOCATION \
  -v`pwd`:`pwd` \
  -w `pwd` \
  -v ${GSDK_LOCATION}:${GSDK_LOCATION} \
  uic_arm64
Alternatively, use the provided runDocker.sh script in the docker directory. Fill out the GSDK_LOCATION and UIC_REPO paths in the script to properly set up the docker image.
Compiling
To compile, run these commands from the top level Unify directory, inside the Docker container:
mkdir build
cd build
cmake -GNinja -DCMAKE_TOOLCHAIN_FILE=../cmake/arm64_debian.cmake ..
ninja               # Build binaries
ninja deb           # Build Debian Installers (optional)
Advanced Feature - Run Raspberry Pi Unit Tests in Docker on the Host
You can run the Raspberry Pi unit tests (and ZigPC binary) within Docker on the Host machine by using QEMU to emulate the ARM architecture, and binfmt in the kernel, to tell Linux OS to run the ARM binaries within QEMU.
To run the unit tests within Docker on the Host machine, run the following command in the Host (not in the Docker container):
docker run --user 0 --privileged --rm -it uic_arm64 update-binfmts --enable
NB: This command needs to be run once after each restart of the Host machine.
After enabling this you can run the unittests by issuing following command in
the uic_arm64 docker image in the build directory:
ninja test
Install Instructions
For installing please refer to the general installation method in Getting started.
Reading Console Logs
ZigPC is built on top of the Zigbee Host Wrapper Library. Currently this library is implemented as a Silicon Labs SLC project using the SiLabs Ember Application framework. Logs from the framework will be shown as a part of ZigPC console logs.
After ZigPC is launched, the logs from ZigPC will be associated with a timestamp, log level, and a tag in the following format:
LOG_TIMESTAMP <LOG_LEVEL> [LOG_TAG] LOG_MESSAGE
<LOG_LEVEL> corresponds to the following:
<d>: Debug log<i>: Info log<w>: Warning log<e>: Error log<c>: Critical log
NOTE: Any log that doesn’t follow the above format is assumed to be part of printed output from the Ember Application framework.
The following snippet is a snippet of example logs to expect:
zigpc --zigpc.serial /dev/ttyACM0 --mqtt.host 0.0.0.0 --mqtt.port 1883 --zigpc.datastore_file zigpc.db
# 2020-11-05 10:55:36:314815 <d> [sl_log] Setting log level to debug
# 2020-11-05 10:55:36:315475 <d> [uic_component_fixtures] Completed: UIC Signal Handler
# ...
# ...
# 2020-11-05 10:55:36:326455 <d> [uic_component_fixtures] Completed: UIC STDIN
# 2020-11-05 10:55:36:326674 <d> [uic_component_fixtures] Completed: ZIGPC Config
# [linux-serial debug] emberSerialInit()
# ...
# ...
# 2020-11-05 10:55:37:961488 <d> [zigpc_smartstart_process] SmartStart Manager Reset with new Gateway
# 2020-11-05 10:55:37:961592 <d> [mqtt_client] Subscribing to: ucl/SmartStart/List
# 2020-11-05 10:55:37:961802 <d> [mqtt_client] Subscription to ucl/by-unid/+/+/OnOff/+/ successful
# 2020-11-05 10:55:37:961979 <d> [mqtt_client] Subscription to ucl/SmartStart/List successful
# ZigPC>
The ZigPC> prompt can be used to carry out common Protocol Controller functions.
Typing “help” brings up the currently supported functions:
ZigPC> help
==================================================
Unify Command line interface Help:
==================================================
exit  :Exit the application
help  :Prints help
info  :Execute 'info' command accessible from the EmberAf CLI
log_level d|i||w|e|c:Set log levelDEBUG | INFO | WARNING | ERROR | CRITICAL
==================================================
Tip: log_level c to reduce the verbosity of log
==================================================
Changing Log Levels
Changing the log levels can be achieved using the log_level command in the “ZigPC>” console on ZigPC. The following formats are supported for this command:
log_level <level>log_level <tag>,<level>
<tag> corresponds to any of the tags you see in the logs (i.e., mqtt_client)
<level> corresponds to any one of the following (can be applied overall or to
a particular log_tag):
“off”: turn off logs
“d”: Show logs up to debug levels (critical, errors, warnings, info, debug)
“i”: Show logs up to info levels (critical, errors, warnings, info)
“w”: Show logs up to warning levels (critical, errors, warnings)
“e”: Show logs up to error levels (critical, errors)
“c”: Show logs up to critical levels (critical
Using Zigbee Network Analyzer to Monitor PAN
The “Network Analyzer” perspective in Silicon Labs Simplicity Studio IDE v5 can be used to analyze the traffic on the Zigbee PAN.
Network activity can be observed based on the UCL commands relayed by ZigPC.
Installing Simplicity Studio v5
If you have not done so already, download Simplicity Studio v5 from https://www.silabs.com/products/development-tools/software/simplicity-studio on a host computer.
Detecting Devices in Simplicity Studio
Devices in Simplicity Studio can be detected using any of the following methods:
Connection via Ethernet Interface
If the host computer and one of the Zigbee devices are connected via Ethernet (using a Wireless Starter Kit for example: https://www.silabs.com/development-tools/wireless/efr32xg22-wireless-starter-kit), Simplicity Studio can capture network traffic using this interface. Either an end device or the gateway radio can be connected via Ethernet to perform network capture (since the serial USB connection, which ZigPC uses, can run independently of the Ethernet connection services).
Instructions:
Ensure that the radio is assigned an IP address (static or dynamic).
In Studio, navigate from the top menu: Window → Preferences.
In the preferences window, go to the left menu and select: Simplicity Studio → Device Manager → TCP/IP Adapters.
In the TCP/IP Adapters view, add your device’s IP Address in the Discovery Subnet Configuration section.
Click on “Apply” and then “OK”.
Devices will now appear in the “Debug Adapters” view.
If the device doesn’t appear, click on the “Refresh” icon in the “Debug Adapters” view.
Connection via Serial USB Interface
Because the Gateway radio is connected to Raspberry Pi running ZigPC, a test end device should be connected to the host computer.
Instructions:
Plug in the end device to the host computer.
Devices will now appear in the “Debug Adapters” view.
If the device doesn’t appear, click on the “Refresh” icon in the “Debug Adapters” view.
Capturing Network Traffic in Simplicity Studio
Using the top menu, select Window → Perspective → Network Analyzer.
Then, in the “Debug Adapters” window, right-click on the connected device and click “Connect”, then click “Start capture”.
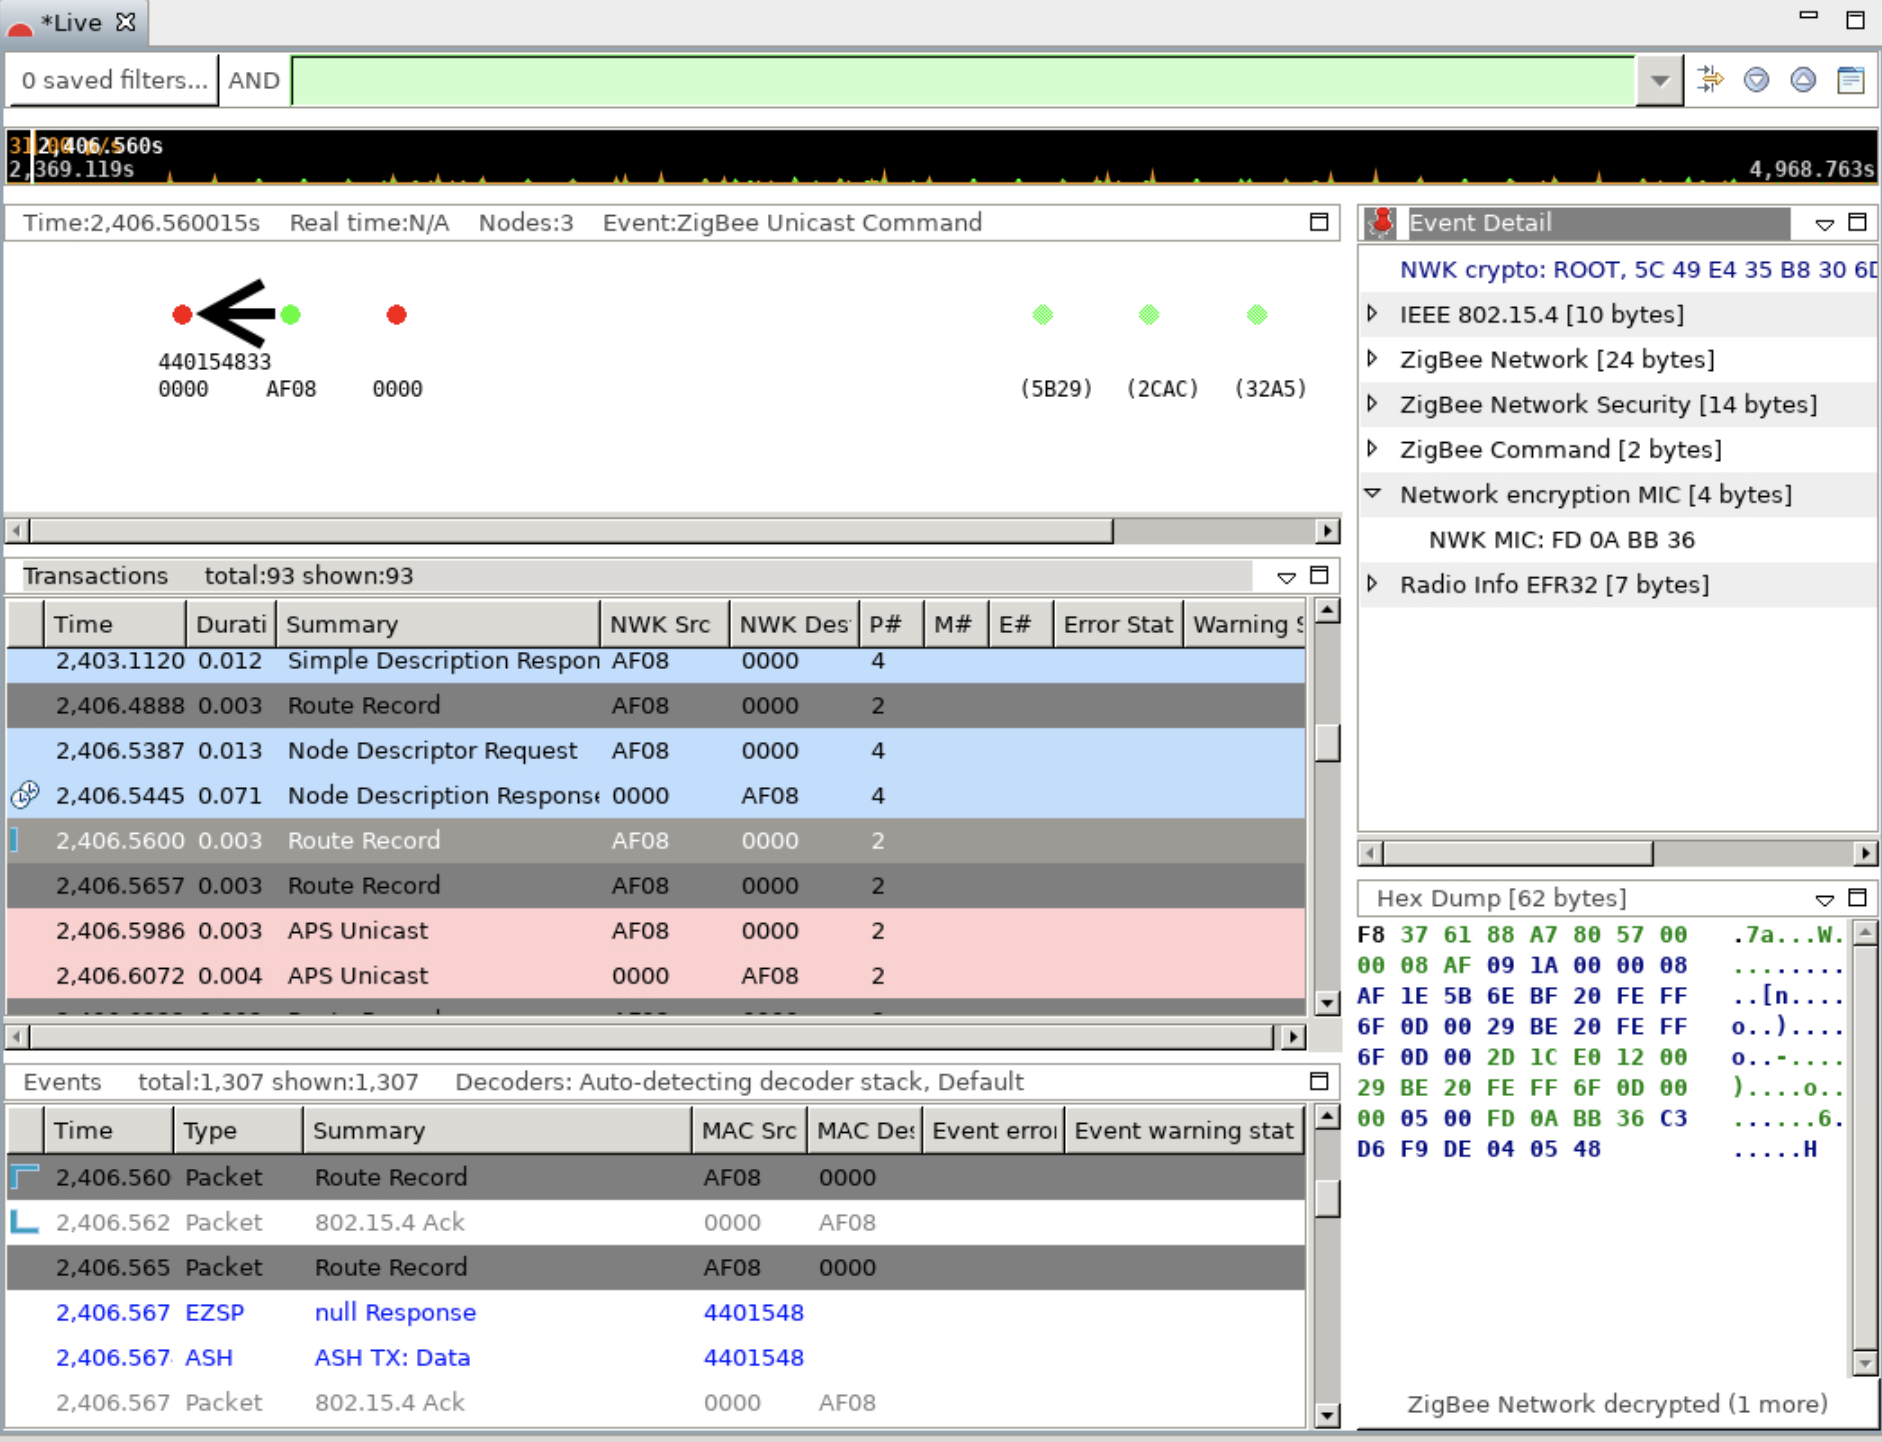
This will trigger the Network Analyzer to record PAN events, as shown below:

The middle table, labeled “Transactions”, can be used to get a high-level overview of messages sent on the network.
Decrypting Network Traffic in Simplicity Studio
ZigPC uses Network key (NWK key) based on the install code. In typical Zigbee applications, the Ember CLI can be used to get this key. The CLI can be re-enabled at compilation time, however, the network information is also printed out at startup.
Look for the following pattern:
[DEBUG] NWK Key:: ZZ ZZ ZZ ZZ ZZ ZZ ZZ ZZ ZZ ZZ ZZ ZZ ZZ ZZ ZZ ZZ
Extract the NWK key value ( ZZ ZZ ZZ ... sequence in the log above) and add
it as a Network Analyzer Security Key using the following instructions:
Open Simplicity Studio v5.
Click from the top menu: Window -> Preferences.
From the left sidebar, select: Network Analyzer -> Decoding -> Security Keys.
Add a New Entry and insert the NWK key as the Key value.
Click Apply then OK.
This NWK key can now decrypt network traffic after the node has joined the network.
For more information, see “Section 6: Using the Network Analyzer” in QSG106: Zigbee EmberZNet PRO Quick-Start Guide.
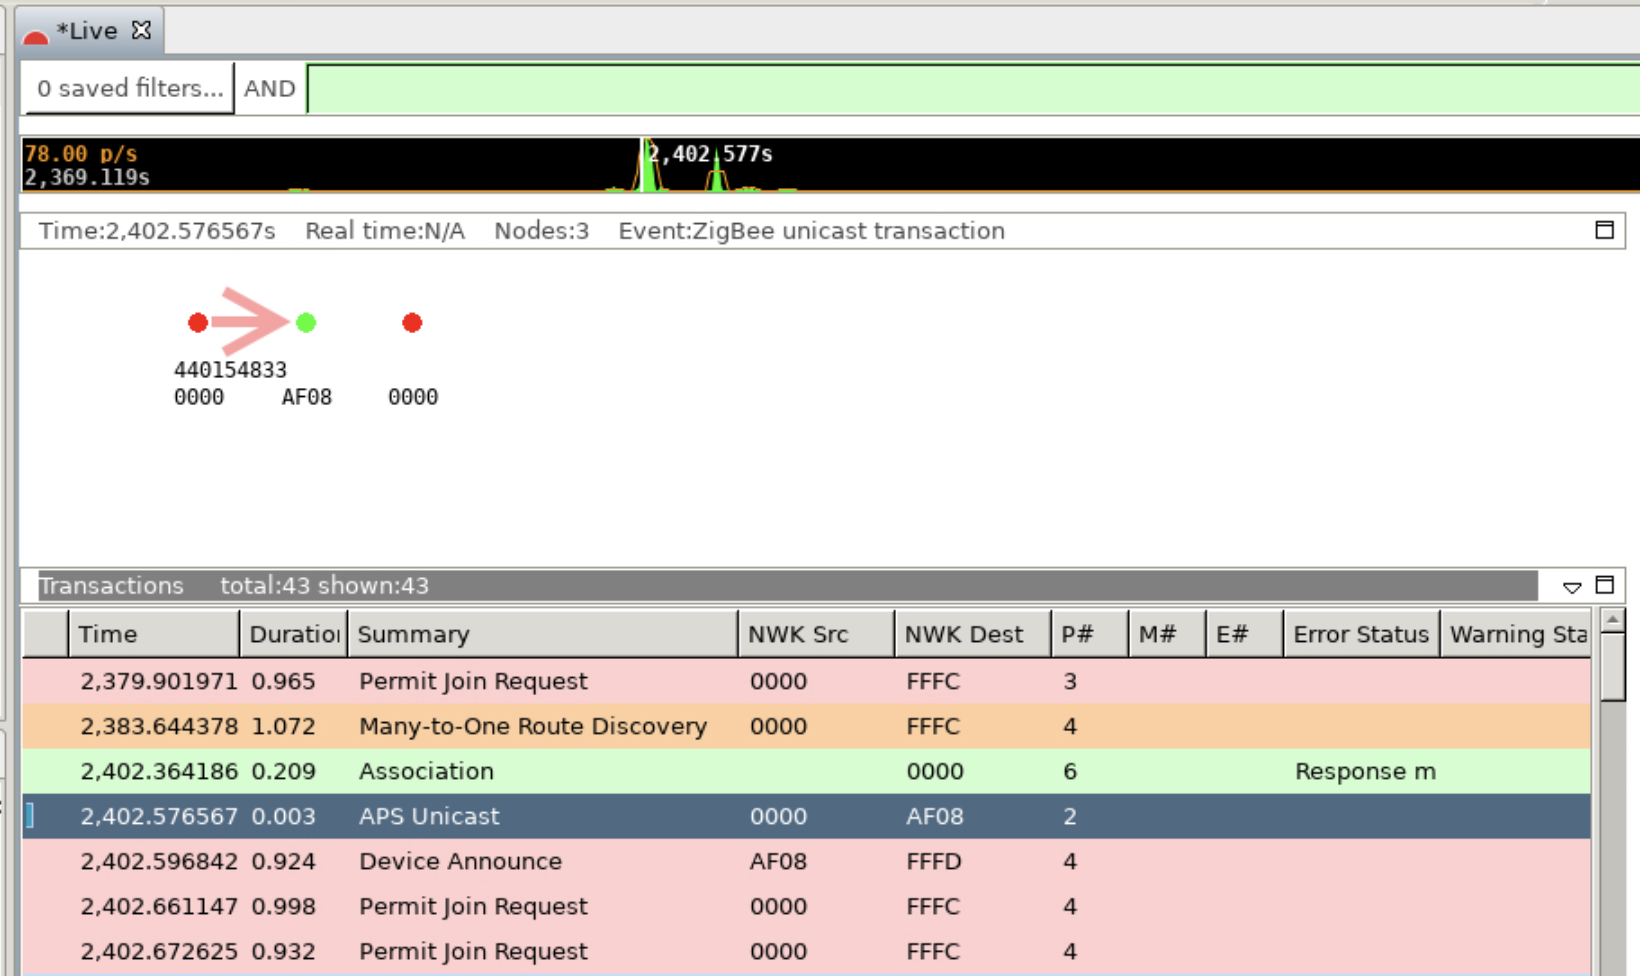
For example, the following decrypted transactions are seen when the SmartStart addition is performed to add an end device to the PAN using the Install Code based DSK:

Adding custom clusters
It is possible to add custom ZCL info to ZigPC to add natively unsupported clusters or to override the functionality of default clusters. This step must be run at compilation time in order to properly include the necessary MQTT topics and other related ZCL information.
Step 1: Adding the custom cluster to the Unify framework
Add a custom XML file (or modify an existing XML file) in the shared components of the Unify framework. All XML files defining ZCL clusters are stored in the ‘uic-dotdot’ component under the ‘dotdot-xml’ folder. If a new XML file is added or if the name of an XML file changes, that change must be reflected in the library.xml file
Step 2: Adding the custom cluster in the ZigPC
ZigPC generates ZCL-cluster code and structures using ZAP. Ensure that the ZAP templates will generate for the new cluster by adding the name to: ‘uic/applications/zigpc/components/zcl_util/zap/addon-helper.js Specifically, the ‘SUPPORTED_CLUSTERS’ and ‘SUPPORTED_CLUSTER_ATTRIBUTES’ lists must reference the new cluster.
Step 3: Adding the custom clusters in the zigbeeHost gateway level
ZigPC uses a custom zigbeeHost layer to manage the zigbee stack. Ensure that this layer can also access the new ZCL cluster by modifying the slcp file in ‘uic/applications/zigpc/components/zigpc_gateway/libs/zigbee_host/src/libzigbee_host.slcp’ Add the new cluster in the same format as all the existing clusters at this layer.
*Step 4: Re-generate all ZAP templates
Unify uses ZAP to generate ZCL cluster information (as discussed in step #2). Make sure that zap can find the library by modifying its configuration file.
Alternatively, compile with the cmake option ‘ZAP_GENERATE’ set to ‘ON’ to automatically re-generate zap output files as part of the compilation process.
Re-generate all zap output in the top level uic for the following components: uic_dotdot, uic_dotdot_mqtt, unify_dotdot_attribute_store
Re-generate all zap output in the zigpc level for the following components: command_mapper, zcl_util, zcl_command_parser, zcl_profiles, attribute_management
Please take a look at [https://github.com/SiliconLabs/zap] for more detailed information.
Step 5: Re-generate the zigbee_host
Re-generate the zigbee_host slcp, in the autogen folder. Set the STUDIO_ADAPTER_PATH to point to zap, which should already be configured to point to the custom xml. Otherwise, it will be necessary to edit the zap-config of the zigbee_host folder.
Please read [https://siliconlabs.github.io/slc-specification/1.0/] and [https://www.silabs.com/documents/public/user-guides/ug520-software-project-generation-configuration-with-slc-cli.pdf] for more information on using the slc_cli.
Step 6:
Compile ZigPC as normal. ZigPC should now support your custom cluster